
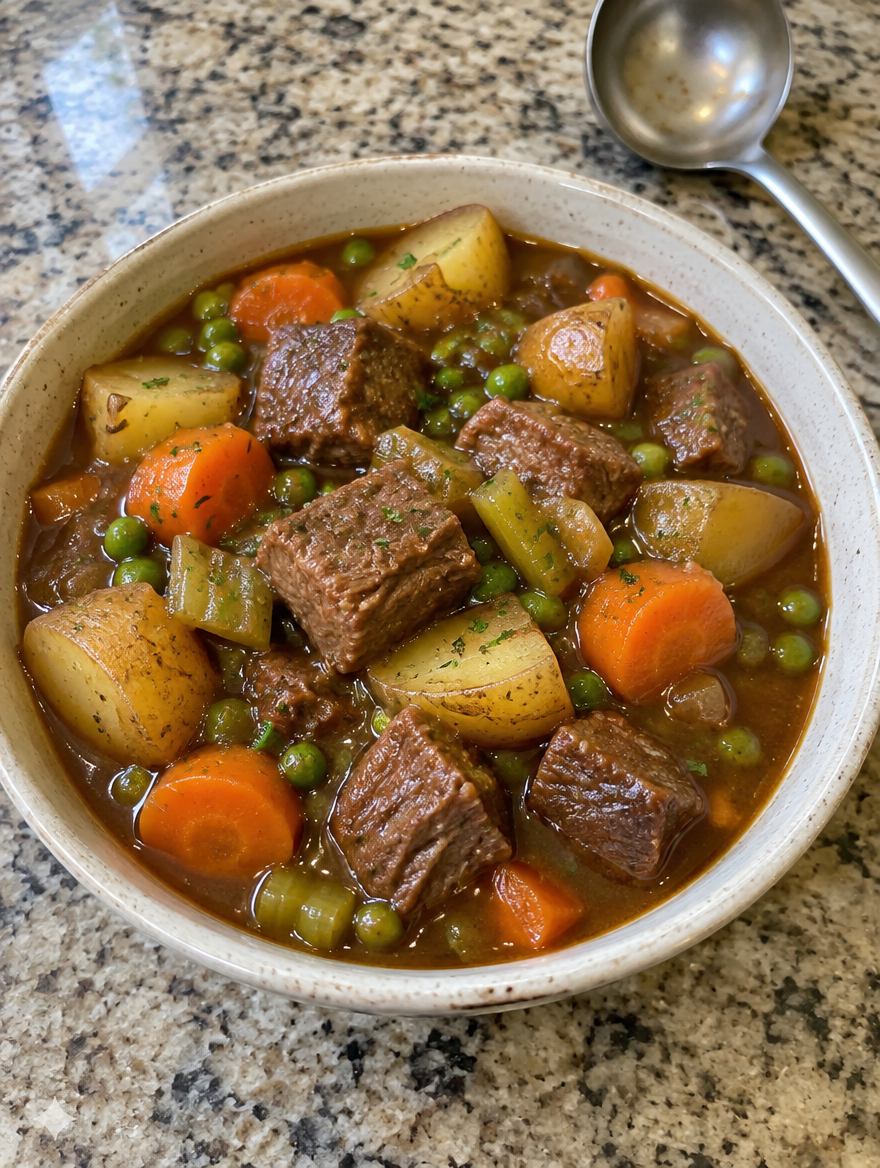
Classic Beef Stew With Carrots and Potatoes
Quick answer: Brown 2 pounds of beef chuck in batches, soften onion and garlic, build a simple beef-broth gravy with tomato paste and a little flour, then gently simmer the beef until it begins to soften. Add potatoes, carrots and celery toward the end so the vegetables stay distinct. Finish with peas, a small splash of cider vinegar and seasoning. This stovetop Dutch-oven version yields about six servings and takes roughly 2 to 2¾ hours of covered, gentle simmering plus preparation and browning.
This recipe is a practical, original editorial formulation for a familiar American home-style beef stew. It has not been independently kitchen-tested. The times are planning ranges rather than proof of a completed kitchen trial. If a food image accompanies the published page, it is an original AI-generated illustration of the intended finished stew, not photographic evidence that a batch was cooked or tasted.
What makes this a classic beef stew?
Classic beef stew centers on cubes of beef that become tender through prolonged moist cooking, a savory broth-based gravy, and vegetables sturdy enough to hold their shape. The distinctive result is not the same as a smooth cream soup, a ground-beef chili or a quick sauté of steak strips. Here, browned chuck gives the liquid a savory foundation while onion, carrot, celery, potato and thyme build familiar flavors. A spoonful of tomato paste supports depth without turning the dish into tomato sauce. No wine, beer, canned condensed soup or unusual commercial seasoning mix is needed.
The key is the order of cooking. Start with meat and aromatics, simmer the chuck until partly tender, then add the vegetables. Potatoes that simmer from the first minute may crumble before a tough piece of meat has softened. Carrots added at the right stage are tender without disappearing. The pot should bubble quietly, not boil furiously. That single temperature habit makes the process much more forgiving.
Ingredients for approximately six servings
- 2 pounds (about 900 g) boneless beef chuck roast, trimmed of large tough exterior fat pieces and cut into roughly 1½-inch cubes. Do not substitute already-cooked beef.
- 1½ teaspoons kosher salt, divided, with adjustments depending on the brand’s crystal size and the sodium in the broth; ½ teaspoon black pepper.
- 2 tablespoons neutral oil, divided as needed for browning.
- 1 large yellow onion, diced to about 1 cup; 3 garlic cloves, minced.
- 2 tablespoons tomato paste and 3 tablespoons all-purpose flour for a light gravy base.
- 3 cups (720 mL) low-sodium beef broth plus 1 cup (240 mL) water, with additional water available if the pot reduces too quickly.
- 1 teaspoon dried thyme and 1 bay leaf, removed before serving.
- 1 pound (about 450 g) Yukon Gold potatoes, cut into approximately 1½-inch pieces; keep edible clean skins if desired.
- 4 medium carrots, peeled or well scrubbed, sliced into thick ¾-inch pieces; 2 celery stalks, sliced into ½-inch pieces.
- ½ cup frozen green peas, for the final five minutes.
- 1 teaspoon apple cider vinegar, added at the end, plus optional fresh parsley for serving.
Allergens and substitutions: The all-purpose flour contains wheat. A prepared beef broth may contain allergens, and Worcestershire sauce is deliberately not part of the core recipe because some versions contain anchovies. Review each packaged ingredient. Oil, flour and broth measurements are part of this formulation; swapping them without adjustment changes the gravy.
Which cut of beef is best?
Boneless beef chuck roast is the recommended cut for this particular stew. Chuck contains connective tissue that requires time and moisture to become pleasantly tender. A large, whole roast lets you choose even pieces and trim only excess hard fat while keeping enough marbling for flavor. Packages labeled “stew beef” can contain a mix of cuts, and mixed sizes may soften unevenly. That does not automatically make them unusable, but you have less control over how long the slowest pieces will need.
Avoid using tender, expensive steaks as if they were chuck. A lean, tender cut does not require the same prolonged simmer and can become dry and stringy under this method. If the cubes are much smaller than 1½ inches, check their tenderness earlier. Keep raw beef cold during prep, use a dedicated clean cutting board and wash the knife and surfaces after handling it. For this article, beef is not ground and no poultry is used, so do not borrow food-safety temperatures intended for hamburger or chicken.
Prepare all the vegetables before heating the pan
Cut the onion and garlic first, then potato, carrot and celery. Keep the potatoes in larger, similar-size chunks and the carrots thick rather than cutting everything into tiny soup dice. Uniform sizes help each ingredient finish at roughly the same point. If you prep potatoes well ahead, cover them with cold water in the refrigerator and drain thoroughly before they enter the pot; do not leave cut vegetables standing warm for hours.
Frozen peas do not need to thaw before use. Save them for the end to preserve their color and texture. The apple cider vinegar is also an end-of-cooking seasoning, not a marinade for the raw beef. The fresh parsley, if chosen, belongs at serving time. This small amount of organization prevents hurried cutting while the meat is searing and reduces the risk of burning onions as you search for ingredients.
Equipment and pot size
A heavy 5- to 6-quart Dutch oven or sturdy lidded stew pot offers enough surface for browning and enough depth to simmer without frequent splashing. A wide bottom is useful for developing browned residue, commonly called fond. A very narrow pot steams the beef if it is crowded; a very thin pan heats unevenly and can scorch the flour-and-tomato base. A wooden spoon or silicone spatula helps scrape the bottom after broth is added.
Have a clean plate for browned beef, tongs, a reliable thermometer for safe food handling, and a ladle ready. The pot should be covered during most of the simmer, but leaving a small vent can help if condensation makes the liquid too thin. Use oven mitts for hot handles; a Dutch-oven lid becomes extremely hot. Do not assume all enamel-coated pots can withstand the same high heat without checking the manufacturer’s instructions.
The eight-step Dutch-oven method
- Prepare and season. Pat the 2 pounds of chuck dry with clean paper towels. Cut into roughly 1½-inch cubes. Season with about 1 teaspoon of the kosher salt and the ½ teaspoon pepper. Dice the onion, mince the garlic and measure the paste, flour and liquids before the pot is hot.
- Brown in batches. Heat 1 tablespoon oil over medium-high heat in a heavy pot. Add beef in two or three uncrowded batches, turning only after a browned crust forms, about 2–3 minutes per broad side. Add the remaining oil as needed. Transfer each batch to a clean plate. The cubes are not cooked through yet; do not taste them.
- Cook aromatics. Reduce to medium heat. Add the diced onion and stir 4–6 minutes until softened and lightly colored, scraping the pan. Add minced garlic for about 30 seconds, stirring constantly so it does not burn. If the pan is dry, add a spoonful of water rather than scorching the fond.
- Build the gravy base. Stir in 2 tablespoons tomato paste and cook approximately 1 minute. Sprinkle in 3 tablespoons all-purpose flour, stirring for about another minute. Slowly pour in 3 cups broth in several additions, whisking or scraping until smooth, then add the 1 cup water, dried thyme and bay leaf.
- Begin the beef simmer. Return the beef and accumulated juices. Bring the liquid just to a boil, immediately lower to a gentle simmer, partially cover, and cook about 75–100 minutes, stirring occasionally, until beef starts to soften. Add small splashes of water if the bottom begins to dry. Time varies with chuck and cube size.
- Add vegetables. Stir in the potato chunks, thick carrot slices and celery. Cover again and simmer about 35–50 minutes, checking occasionally, until the beef is fork-tender and potatoes and carrots can be pierced without collapsing. Add liquid sparingly if needed; avoid a rolling boil.
- Finish the sauce. Stir in ½ cup frozen peas for the last approximately 5 minutes. Remove the bay leaf. Add 1 teaspoon cider vinegar, taste safely once the entire stew is fully cooked, and adjust with the reserved salt as needed. If the gravy is thin, simmer uncovered briefly; if overly thick, add hot water a tablespoon or two at a time.
- Serve and cool safely. Ladle into bowls and garnish with parsley if desired. Serve hot. Promptly transfer extra stew into shallow food-safe containers and refrigerate within two hours, or one hour in temperatures above 90°F; follow USDA leftover guidance. Never leave a large covered Dutch oven of stew cooling on the counter overnight.
Why browning the beef matters
Searing produces savory browned surfaces and leaves flavorful bits in the pan. Those bits dissolve into the broth when the liquid is added, supplying complexity that a pot of raw beef and water would not have. Yet browning does not mean cooking the meat all the way through. The purpose is developing a surface before the long simmer completes the cooking and tenderization.
For reliable browning, dry the pieces thoroughly and leave space between them. If a full two pounds goes into a small pot at once, moisture collects and the beef begins to steam. Work in batches, adjust heat if the browned bits turn black, and resist stirring every few seconds. A deep golden-brown color is useful; burned, acrid residue is not. If there is genuinely burnt debris, wipe it out safely and resume rather than trying to hide bitterness with more spices.
How to avoid tough beef
The biggest cause of chewiness in stew is stopping before a chuck cut’s connective tissue has softened. Chuck needs sufficient time at a modest simmer. A piece may be safely heated through yet still resist the fork; that means it needs more gentle cooking rather than a hotter boil. Check a large cube at the 75-minute mark and keep monitoring during the vegetable stage. A gentle fork should slide into a properly tender piece without forcing it.
A second cause is high, aggressive boiling. Violent bubbling tightens muscle fibers and reduces broth quickly, leading to dry or stringy meat even when liquid remains. Once the pot boils, immediately turn it down to a quiet simmer. Different stove burners, pot diameters and cube sizes change timings, so the ranges given here are not guarantees. Do not claim the recipe was physically tested in a particular Dutch oven.
How much broth should be in the pot?
The goal is enough liquid to circulate around the meat and vegetables without turning the stew into a thin soup. Three cups of low-sodium broth plus one cup water are the starting point for a typical heavy pot; the meat and vegetables release additional liquid as they cook. A wide pot with an uncovered lid loses moisture faster than a deep, well-sealed one. Check the pot periodically rather than trusting an exact volume after two hours.
If liquid falls below the ingredients and the bottom threatens to scorch, add small amounts of hot water and stir. If there is too much liquid at the end, remove the lid and simmer carefully until the texture is a little thicker. Do not boil violently to force a fast reduction: tender beef and vegetables can break apart. Remember that the flour contributes body as the stew simmers and cools.
The role of tomato paste and thyme
Tomato paste brings a little concentrated sweetness and savory depth without turning the stew into a tomato-forward braise. Heating it briefly after the onion cooks changes its raw, sharp character. The tablespoon-scale quantity is deliberate: adding an entire can would yield a different sauce. Dried thyme gives an understated herbal background; a bay leaf rounds out the broth and should be removed before serving.
This version does not include paprika, cayenne, rosemary or commercial steak sauce in the main formula. Those can make good alternative stews, but the core goal here is a recognizable beef-and-vegetable flavor. The final teaspoon of cider vinegar brightens a sauce that may otherwise taste heavy after long simmering. Add the vinegar after cooking and taste before increasing it—more acid is not always better.
When to add carrots and potatoes
Add both vegetables after the beef has simmered most of the way to tenderness. Potatoes release starch as they cook, and that starch can thicken the sauce; too much cooking can make them disappear. Yukon Gold potatoes generally hold together well in large chunks while giving the stew a creamy interior. Floury baking potatoes are more likely to break apart if cooked for a long time, though exact behavior depends on the particular potato and cut.
Carrots and celery can withstand simmering, but they still taste better when they retain identifiable pieces. A large carrot round may need more time than a thin slice. If the potato becomes ready while the beef remains tough, scoop out the vegetables carefully and return them for the final minutes after the beef softens. This rescue is better than leaving the potatoes to disintegrate.
How to make the gravy smooth
Sprinkle flour over the lightly cooked tomato paste and onion, stirring so there are no dry flour pockets. Then add broth in several small pours while stirring. Gradual dilution helps the flour disperse and avoids large lumps. The liquid may look thin at first; it should develop body through the simmer and as potato starch enters the pot. Resist adding several extra tablespoons of flour early, because the final sauce can become pasty.
If a few lumps remain, press them gently against the side with a spoon before the beef goes back in. If the sauce eventually seems too thick, add warm water. If it is too thin, simmer uncovered and stir without scraping up burned residue. Avoid adding a large flour-and-cold-water slurry without fully cooking it; raw flour flavor and clumps are common problems with emergency thickening.
Serving ideas without crowding the bowl
This stew already contains meat, potatoes and vegetables, so it is close to a complete one-bowl dinner. A slice of crusty bread is helpful for the gravy, and a simple green salad can offer contrast. Rice or mashed potatoes are optional, though using both a potato-rich stew and a large starch side may make the plate heavier than intended. Portion equal amounts of meat and vegetables so one diner does not receive nearly all potatoes and another mostly broth.
For another comforting, beef-centered meal with a different texture, see MySavorista’s Southern Dirty Cabbage Skillet with Ground Beef and Smoked Sausage. If you prefer oven-baked pasta, Baked Mostaccioli with Beef and Mozzarella follows an entirely different, cheesy dinner method. To plan a separate creamy starch side for another meal, Creamy Parmesan Garlic Orzo in One Pot is a useful companion recipe. These links are alternatives and accompaniments, not ingredients silently added to this stew.
Food safety for beef and leftovers
Handle raw beef separately from foods ready to eat, wash your hands and sanitize utensils and surfaces after contact. USDA gives 145°F with at least a three-minute rest as the minimum for whole beef cuts such as steaks and roasts; ground beef has a different 160°F minimum. This recipe uses cubed chuck from a whole roast and intentionally simmers it substantially longer to reach fork tenderness. Do not stop simmering simply because a piece reaches a minimum number while it is still chewy. Check the current USDA safe internal temperature guidance.
For leftovers, USDA advises refrigerating prepared food within two hours, or one hour above 90°F, using shallow containers to cool more quickly. Keep refrigerated stew at 40°F or below and use within 3–4 days under proper handling, or freeze for longer storage. When reheating leftovers, heat thoroughly to 165°F; bring soup or stew gravy to a boil while stirring for even heating. See the official USDA leftover handling advice and USDA reheating guidance. Smell and appearance alone cannot prove that neglected leftovers are safe.
Planning the cooking schedule
Allow about 25 minutes for trimming, cubing and preparing vegetables, 20 minutes to brown beef and build the pan base, roughly 75–100 minutes for the first covered simmer, another 35–50 minutes after the vegetables go in, and about five minutes for peas and seasoning. Some tasks overlap, so these are stages rather than a promise of a fixed clock. A conservative dinner plan is about 3 hours total, with a 2 hour 40 minute to 3 hour 20 minute planning range, plus a little extra buffer for unusually tough chuck.
If you must start dinner at a precise time, make the stew ahead and reheat it safely instead of rushing the meat. The gravy often becomes thicker after chilling because starches and gelatin set; add a small amount of water while reheating. Keep the reheating process hot enough, stir and check the center temperature with a food thermometer. Do not use a slow cooker as the primary means of reheating refrigerated leftovers.
Make-ahead and freezer instructions
Stew can be made ahead if it is cooled rapidly in shallow containers and stored promptly. Portion the leftovers into containers that hold about one or two servings; smaller containers cool and reheat more evenly. If freezing, label with the recipe name and date. Beef and broth freeze more consistently than cooked potatoes, which can become grainy or crumbly after thawing. That texture difference is a quality consideration, not proof the food is unsafe when properly handled.
For best eating quality, freeze in sealed freezer-safe containers with a little expansion space and aim to use within about two to three months. Thaw in the refrigerator, not on the counter. Reheat in a saucepan over moderate heat, stirring frequently, until the entire portion reaches the applicable 165°F leftover-reheating temperature. If the potatoes soften further, handle the stew gently rather than vigorous stirring.
Adjustments if your stew is too salty or too acidic
Salt content varies widely among broths and kosher salt brands. This recipe begins with a limited salt addition and reserves the remainder for final adjustment. If your broth is already salty, reduce or omit the initial salt and season once the stew is completely cooked. Do not promise that adding a raw potato will pull a reliable quantity of salt out of an oversalted stew; dilution with unsalted liquid is the more predictable option, though it also thins the gravy.
If the final sauce tastes unexpectedly sharp, check the amount of apple cider vinegar and whether the tomato paste browned too aggressively. The listed amount is small. For a milder result in a future batch, omit the vinegar rather than sweetening the stew heavily. If the gravy is bland, check salt first, then consider an extra small pinch of thyme or a splash of vinegar. Change one element at a time.
Common mistakes and how to prevent them
Crowding the searing pot creates steam instead of a browned crust. Burning garlic causes bitterness before simmering has even started. Boiling hard instead of simmering can dry meat and reduce broth excessively. Adding potatoes too early makes the vegetables collapse before the chuck is tender. Using high-sodium broth and the full salt amount at once may produce an over-seasoned sauce that is difficult to correct.
A less obvious problem is assuming the cooking schedule is exact. Beef chuck varies between packages, and a low-power burner behaves differently from a high-output one. Checking the pot every 20–30 minutes during braising is more useful than setting one timer and forgetting it. A final safety error is leaving the large pot to cool overnight; portioning promptly prevents that unnecessary risk.
Questions about classic beef stew
Can I make this recipe without a Dutch oven?
Yes. Use a heavy, deep, lidded pot with enough room to brown in batches and simmer gently. A thin pot needs closer attention because flour can stick or scorch.
Is stew beef the same as chuck roast?
Not always. Precut stew beef may be made from several muscles or cuts. A labeled chuck roast gives you more consistent pieces and predictable braising behavior.
Should I coat the beef in flour before browning?
This version browns uncoated beef and adds flour after the onion and tomato paste. That helps limit burnt flour on the pan while still thickening the final broth.
Can I skip tomato paste?
You can, but the flavor will be less savory and the gravy a little lighter. The recipe has not been independently tested without it.
How long should chuck simmer before potatoes go in?
Begin checking at approximately 75 minutes. The recipe estimates 75–100 minutes first, followed by 35–50 minutes with vegetables; actual tenderness matters more than the timer.
How do I know when the beef is tender?
A fork should penetrate a large cube with little resistance. A chewy cube often needs more gentle cooking even if it has been heated through.
Can I use sweet potatoes?
They soften differently from Yukon Gold potatoes and may partly dissolve. That would be a different variation needing adjusted timing rather than a direct swap.
What if the stew is too watery?
Simmer uncovered for several minutes while watching the pot. The flour and potato starch will also thicken the sauce as it rests.
What if the gravy becomes too thick?
Add hot water a tablespoon or two at a time until spoonable, then recheck seasoning. Avoid adding a whole cup without assessing the texture.
Can I leave the peas out?
Yes. Peas are a finishing vegetable in this version. Omitting them does not change the beef simmer or potato timing.
Does this recipe contain alcohol?
No. Its liquid is low-sodium beef broth and water, with a small quantity of cider vinegar at the end.
Is this recipe gluten-free?
No. The core version uses all-purpose wheat flour, and broth may contain additional allergens. A gluten-free gravy requires separately validated ingredients and thickening behavior.
How long are leftovers safe in the refrigerator?
Under prompt cooling and a refrigerator at 40°F or colder, USDA generally recommends using cooked beef leftovers within 3–4 days. Discard improperly stored food sooner.
What temperature should reheated stew reach?
Heat leftovers thoroughly to 165°F with a food thermometer. Stir during reheating and bring the liquid gravy to a boil.
Can I freeze leftover stew?
Yes, after prompt safe cooling. Freeze in sealed portions, understanding that potatoes may become softer after thawing and reheating.
Recipe at a glance
Yield: six bowls, about 1½ cups each depending on reduction. Preparation: about 25 minutes. Cooking: approximately 2 hours 15 minutes to 2 hours 55 minutes, with variation by beef cut. Total planning time: about 2 hours 40 minutes to 3 hours 20 minutes. Method: sear, simmer, then add vegetables. Cuisine: American home-style comfort food. Important: this is an original editorial recipe, not an independently kitchen-tested claim, and any AI food image is an illustration.
Print
Classic Beef Stew With Carrots and Potatoes
- Prep Time: About 25 minutes
- Cook Time: About 2 hours 15 minutes to 2 hours 55 minutes (varies with beef tenderness)
- Total Time: About 2 hours 40 minutes to 3 hours 20 minutes
- Yield: About 6 servings 1x
- Category: Comfort Classics & Casseroles
- Method: Dutch-oven searing and gentle covered stovetop braising
- Cuisine: American
Description
Classic Dutch-oven beef stew with browned chuck, carrots, Yukon Gold potatoes and celery in a gently simmered, lightly thickened beef-broth gravy.
Ingredients
2 pounds (about 900 g) boneless beef chuck roast, cut into 1½-inch cubes
1½ teaspoons kosher salt, divided and adjusted for broth and salt brand
½ teaspoon ground black pepper
2 tablespoons neutral oil, divided as needed
1 large yellow onion, diced (about 1 cup)
3 garlic cloves, minced
2 tablespoons tomato paste
3 tablespoons all-purpose flour
3 cups (720 mL) low-sodium beef broth
1 cup (240 mL) water, plus small additions if needed
1 teaspoon dried thyme
1 bay leaf, remove before serving
1 pound (450 g) Yukon Gold potatoes, cut into 1½-inch chunks
4 medium carrots, cut into thick ¾-inch slices
2 celery stalks, sliced to ½ inch
½ cup frozen green peas
1 teaspoon apple cider vinegar
Optional chopped fresh parsley to serve
Instructions
Pat 2 pounds of chuck dry, cut into similar 1½-inch cubes and season with 1 teaspoon kosher salt and ½ teaspoon pepper. Prepare the onion, garlic and vegetables with clean tools.
Heat 1 tablespoon oil in a 5–6-quart Dutch oven over medium-high heat. Brown the beef in 2–3 uncrowded batches, about 2–3 minutes per broad side, adding remaining oil as needed. Set beef aside; it is not yet fully cooked.
Lower heat to medium. Cook diced onion 4–6 minutes, loosening browned residue, then add minced garlic for about 30 seconds until fragrant.
Stir in 2 tablespoons tomato paste for about one minute, then 3 tablespoons flour for another minute. Gradually stir in 3 cups low-sodium beef broth and 1 cup water until smooth; add 1 teaspoon thyme and the bay leaf.
Return beef with any accumulated juices, bring briefly to a boil, reduce immediately to a gentle simmer, partially cover and cook approximately 75–100 minutes until the beef begins to soften; check liquid and stir occasionally.
Add 1 pound potato chunks, four thickly sliced carrots and two sliced celery stalks. Continue a gentle covered simmer 35–50 minutes or until beef is fork-tender and vegetables are tender but intact; avoid a rapid boil.
Add ½ cup frozen peas for the final approximately five minutes. Remove bay leaf; stir in 1 teaspoon cider vinegar, adjust with remaining salt, and thin with hot water or reduce uncovered briefly only if needed.
Serve promptly in bowls. Cool leftovers rapidly in shallow containers and refrigerate within two hours (one hour if above 90°F); reheat all leftovers thoroughly to 165°F, and follow USDA refrigeration guidance.
Notes
Editorial formulation has not been independently kitchen-tested; timings vary by chuck cut, cube size, pot and burner. The food illustration, if used, is AI-generated, not proof of a physical cooking trial. This recipe contains WHEAT in all-purpose flour; check broth labels for allergens. The core recipe contains no wine or beer. For safe handling, keep raw beef separate from ready-to-eat foods; cooked-beef leftovers should be chilled promptly at 40°F or below and used within 3–4 days under USDA guidance. Reheat leftovers to 165°F. Actual tender beef is the cooking endpoint; do not mistake the beef roast minimum 145°F with 3-minute rest for this recipe’s desired braised tenderness.
Nutrition
- Serving Size: Approximately 1½ cups per bowl, depending on reduction
Keywords: classic beef stew recipe, Dutch oven beef stew, beef stew carrots potatoes, homemade beef stew