
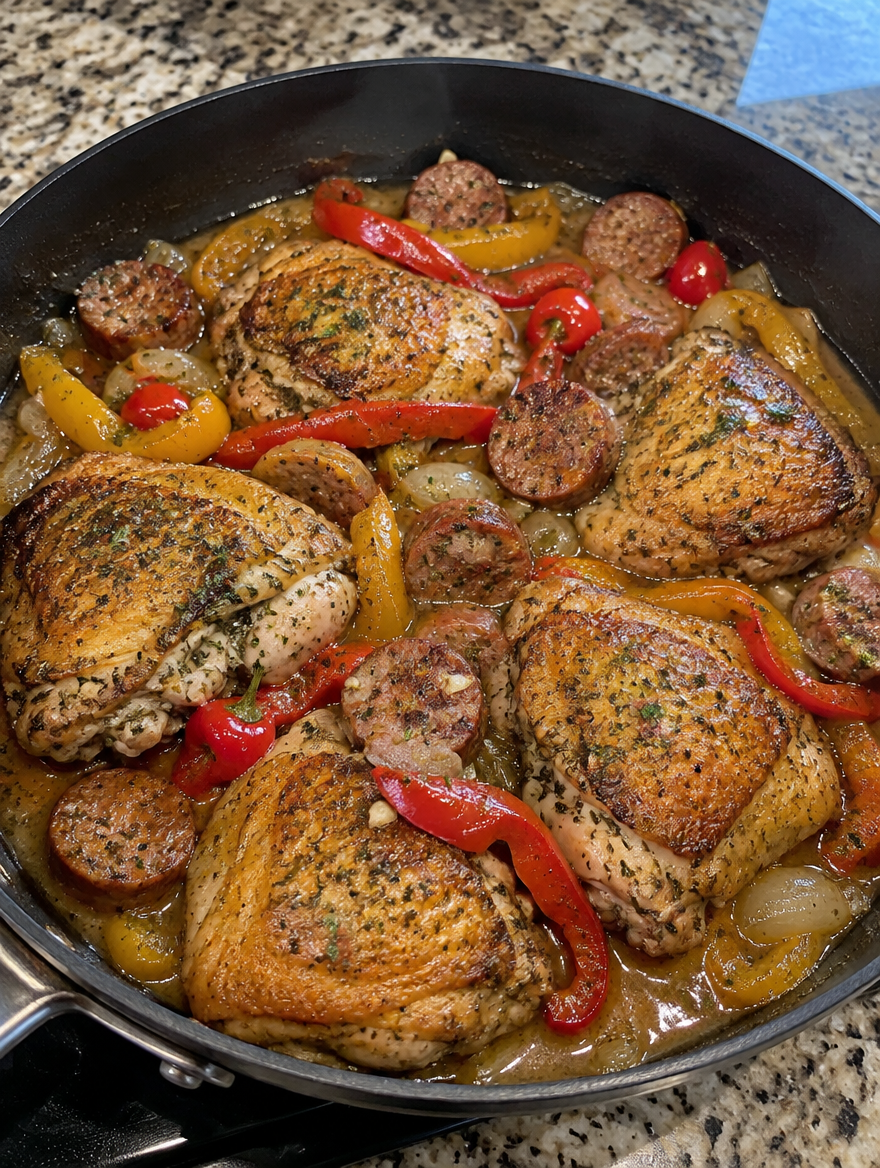
Chicken Scarpariello With Sausage and Vinegar Peppers
Editorial transparency: This original, Italian-American-inspired recipe has not been independently kitchen-tested. Times are editorial cooking estimates, and safe final temperatures must be checked with a food thermometer. If published, the accompanying original AI-generated food image is an illustration of the intended final dish, not evidence of a physical cooking trial.
What Is Chicken Scarpariello?
Chicken scarpariello is an Italian-American skillet or braised chicken preparation associated with the New York restaurant tradition. Its defining appeal is the balance between browned chicken, savory sausage, sweet peppers, acidic pickled peppers and a concentrated pan sauce. The phrase sometimes appears in searches as “chicken scarparo”; this article answers that query while using the widely recognized dish name scarpariello. It does not claim to reproduce a single authoritative family or restaurant version.
This version uses bone-in chicken thighs, fully cooked or raw Italian sausage handled according to its label, sweet bell peppers, jarred pickled cherry peppers, chicken stock and a measured splash of red wine vinegar. It does not rely on wine. The tang should be noticeable but not harsh, and the chicken should remain juicy rather than submerged in a thin soup. The recipe is designed for a large skillet with a lid and is written for four generous servings.
Quick answer: Brown the chicken and sausage separately, soften the peppers and aromatics, deglaze with stock and a little vinegar, then gently simmer the chicken until its thickest part reaches at least 165°F. Add the pickled peppers and adjust the sauce at the end so the acidity stays lively.
Ingredients for Four Servings
- 2 pounds bone-in, skin-on chicken thighs, approximately 4 to 6 pieces
- 12 ounces mild or hot Italian sausage, raw links, sliced into thick rounds only after cooking, or removed from casings and browned as crumbles
- 1 tablespoon olive oil, plus a little more only if the skillet is dry
- 1 medium red bell pepper, seeded and sliced into 1/2-inch strips
- 1 medium yellow bell pepper, seeded and sliced into 1/2-inch strips
- 1 small yellow onion, thinly sliced
- 4 garlic cloves, minced
- 1 teaspoon dried oregano
- 1/2 teaspoon freshly ground black pepper
- 1/2 teaspoon kosher salt initially, with additional seasoning only after tasting
- 3/4 cup unsalted or low-sodium chicken stock
- 1/3 cup drained jarred pickled cherry peppers, quartered; use sweet or hot to taste
- 1 tablespoon red wine vinegar, with another teaspoon optional after tasting
- 1 tablespoon chopped flat-leaf parsley for finishing
Ingredient label note: Some Italian sausage contains milk, wheat, or other allergens; stock and jarred peppers may also contain unexpected ingredients. Check every package. Raw poultry and raw sausage must be kept separate from ready-to-eat ingredients. Never reuse their cutting board or utensils without washing.
Equipment and Timing
Use a 12-inch heavy skillet or shallow Dutch oven with a fitted lid, tongs, a clean plate, a sharp knife, a cutting board, and an instant-read food thermometer. A smaller skillet may require browning in batches. Plan approximately 20 minutes of preparation and 40–50 minutes of cooking, depending on thigh size and whether the sausage is raw. The total is an estimate, not a tested timing guarantee. The temperature of the chicken, not the clock, determines doneness.
Eight-Step Stovetop Method
Step 1 — Prepare safely
Wash hands with soap and water before and after handling raw meat. Pat chicken dry with disposable paper towels; do not rinse poultry. Season with the initial salt and pepper. Slice the bell peppers and onion on a clean board before handling raw meat, or sanitize the board thoroughly between tasks. Drain the pickled peppers, reserving no brine until you have tasted the finished sauce.
Step 2 — Brown the chicken
Heat the olive oil over medium-high heat in a large heavy skillet. Lay chicken skin-side down without crowding. Brown for approximately 5–7 minutes, then turn and brown the other side for 3–4 minutes. Adjust heat to avoid burning the fond. Transfer to a clean plate reserved for raw or partially cooked meat. The chicken is not cooked through at this stage.
Step 3 — Cook the sausage
If using raw links, brown them whole in the skillet, turning regularly until cooked through according to their product label and a thermometer; use 160°F for raw pork or beef sausage and 165°F for poultry sausage. Transfer to a clean surface and slice into thick rounds. Alternatively, remove raw sausage from its casing and cook it as crumbles to the same appropriate temperature. Do not rely on browning alone as evidence of doneness.
Step 4 — Soften the vegetables
Reduce heat to medium. Pour off excess rendered fat, leaving about 1 tablespoon in the skillet. Add bell peppers and onion. Cook 6–8 minutes, stirring occasionally, until softened and lightly browned. Add garlic and oregano and stir for 30–45 seconds, just until fragrant; garlic should not scorch.
Step 5 — Build the sauce
Pour in the stock and scrape the browned bits from the bottom with a wooden spoon. Add the measured tablespoon of red wine vinegar. Bring to a gentle simmer. Taste a small spoonful of the sauce before the chicken goes back in; it should taste savory with a gentle tang, not aggressively sour. Avoid tasting anything that has touched raw chicken.
Step 6 — Simmer the chicken
Nestle the partially cooked chicken into the sauce skin-side up. Cover loosely and simmer over medium-low heat, checking periodically, until the thickest part of every piece reaches at least 165°F, measured without touching bone. This may take roughly 20–30 minutes after browning, but thickness and pan heat vary. If the liquid evaporates before the chicken is done, add stock in small increments. Keep the pan at a steady simmer, not a hard boil.
Step 7 — Finish the peppers and sausage
Add the already fully cooked sausage and drained pickled cherry peppers to the skillet for the final 3–5 minutes, until everything is hot. If using a different sausage method, verify the sausage is fully cooked before serving. Remove the lid briefly if the sauce needs reducing. Taste and adjust with a small splash of vinegar or a little additional stock; avoid dumping in jar brine without tasting, as salt and acidity vary.
Step 8 — Check, rest and serve
Recheck the largest chicken piece at its thickest part: it must read at least 165°F. Transfer to a clean platter, spoon over the peppers and sausage, and finish with parsley. Let the chicken rest a few minutes before serving. Serve with crusty bread, roasted potatoes, rice, or a simple vegetable side. Refrigerate leftovers promptly in shallow covered containers.
A practical timeline for a one-skillet dinner
Plan about twenty minutes for ingredient preparation, then roughly fifteen to twenty minutes for the sequential browning and vegetable base. The chicken’s final simmer can require twenty to thirty minutes or longer depending on the thickness of each bone-in piece and how vigorously the skillet heats. The finished dish is ready only when the thickest part of every chicken piece measures at least 165°F without touching bone. A conservative planning window is about seventy to eighty minutes from starting prep through final serving; the thermometer takes priority over the timer.
Put a clean plate beside the stove for the seared chicken and a separate clean board for cooked sausage. Do not put safely cooked sausage back on a board that held raw chicken unless it has been washed and sanitized. With a smaller skillet, brown the chicken in two batches, never stacked. Sauté the onions and sweet peppers after the meat has been removed so they absorb some of the browned flavors without being crushed under the chicken pieces. The late addition of pickled cherry peppers lets you assess their heat and acidity before they dominate the sauce.
Managing sausage, acidity and heat
Commercial Italian sausage can be seasoned heavily, so use a modest initial salt amount and wait until the browned sausage returns to the pan before adjusting. Pork or beef sausage must reach 160°F if raw, while poultry sausage must reach 165°F, following its ingredient type and label. Pre-cooked sausage needs the label’s reheating instructions, not an assumption that all links arrive raw. The recipe card specifies raw links cooked fully before slicing; don’t slice undercooked sausage merely because its casing has browned.
Jarred cherry peppers range from mild and sweet to sharp and hot. The listed 1/3 cup is drained, so it provides pepper flavor without pouring an uncontrolled amount of salty pickling liquid into the skillet. One tablespoon of red wine vinegar is a starting dose for brightness. Taste only the fully cooked mixture, then adjust with no more than an additional teaspoon if the sauce needs lift. Bell peppers provide sweetness that balances this tang; neither hot sauce nor sugar is necessary to force a sweet-and-sour flavor. When feeding children or heat-sensitive diners, select mild pickled peppers and mild sausage rather than making the whole skillet fiery.
How to hold the chicken if vegetables need more time
If a piece of chicken reaches a safe temperature before the peppers soften to the texture you prefer, transfer the chicken to a clean warm plate and cover loosely while the vegetables cook for a few more minutes. Return the chicken for a brief final warm-through, checking again if needed. Avoid leaving safely cooked chicken at room temperature while the sauce is simmering for a prolonged period. The point of this adjustment is avoiding leathery meat, not cooking poultry below its required safe temperature.
Conversely, if the peppers are tender but the thickest chicken piece has not reached 165°F, keep the skillet at a gentle simmer, add a little low-sodium stock if the bottom dries, and continue cooking the chicken. Smaller thighs can finish ahead of larger ones. Do not rely on color alone: a beautifully browned skin can hide an undercooked interior. The thermometer is more reliable than the appearance of meat juices or the outside crust.
Why Brown the Chicken First?
Browning creates the savory crust and pan fond that give a relatively short braise a deeper flavor. The purpose is not to cook the chicken all the way through in the first pass. Bone-in thighs can darken on the outside while remaining undercooked near the bone. The thermometer check in the simmering stage is essential.
Skin-side-down contact also renders some fat. Too much fat makes the sauce greasy, which is why the method asks you to pour off excess before adding the vegetables. A small amount carries flavor and helps the peppers soften; a pool of oil overwhelms the bright sauce. If the fond turns black rather than deep brown, reduce the heat and wipe out the burnt bits rather than scraping bitterness into the liquid.
Sweet Peppers Versus Pickled Cherry Peppers
Bell peppers provide sweetness and body; pickled cherry peppers provide acidity, color and optional heat. They are not interchangeable. If the cherry peppers are particularly spicy, start with half the quantity and add more after tasting. If the jarred peppers are very salty, drain them thoroughly and reduce the initial salt. A tablespoon of vinegar is a starting point, not a requirement to make the sauce painfully sharp.
The vinegar should brighten the stock and meat juices. Adding it in measured amounts avoids a common problem: a sauce that tastes like straight pickling liquid. Stock brands and pickled pepper brands vary, so a final taste is more useful than adding extra acid automatically. When the sauce is too acidic, add a little unsalted stock and reduce gently; do not add large quantities of sugar to hide the imbalance.
Choosing Chicken Thighs
Bone-in, skin-on thighs are a practical choice for this method because they tolerate a short simmer without drying as quickly as lean breast meat. Pieces of roughly similar size finish more evenly. If the package contains a very large thigh beside a small one, measure each separately. The largest piece may need extra time even if the smallest is ready.
Boneless thighs can work, but their cooking time changes. Chicken breast also requires a shorter, more attentive simmer and can dry out if cooked for the same duration as bone-in thighs. This source recipe intentionally specifies one cut so the card and instructions stay consistent. Do not swap cuts while treating the timing as fixed.
Sausage Options Without Confusion
Raw Italian sausage should be cooked thoroughly before the final sauce stage. This makes the process easier to control and prevents the reader from mistaking a browned exterior for a safe interior. Pork or beef sausage requires a different safe minimum temperature from poultry sausage. Always confirm what kind of sausage the package contains.
For a less spicy dish, choose mild Italian sausage and sweet pickled peppers. For more heat, choose hot Italian sausage or hot cherry peppers, but consider changing only one at a time. A very spicy sausage plus a large dose of hot pickled peppers can overpower the chicken and make the finished sauce difficult to balance.
How to Keep the Sauce From Becoming Watery
A broad skillet exposes more liquid to heat and helps the stock reduce. Keep the chicken partly above the liquid rather than drowning it. If the sauce is still thin after the chicken reaches a safe temperature, move the chicken to a clean warm platter and simmer the sauce uncovered for a few minutes, then return everything briefly to heat. This protects the meat from needless overcooking.
Do not thicken the sauce with a large flour slurry: the intended texture is a glossy pan sauce, not gravy. If the pan looks dry before the chicken finishes, add a little more stock and cover. If it looks greasy, skim the surface rather than reducing the grease into the sauce.
Troubleshooting
Chicken browns too quickly: Lower the burner, especially with thin stainless steel. Dark golden brown is useful; charred garlic or burnt fond is not. If the oil smokes, stop and allow the skillet to cool slightly.
Skin becomes soft during simmering: This is normal in a covered skillet. For a crisper finish, briefly place fully cooked pieces skin-side up under a broiler only if your cookware is broiler-safe, monitoring closely; the main recipe does not require this optional step.
Sauce is too sour: Drain the pickled peppers more thoroughly next time and add vinegar gradually. A small splash of unsalted stock can soften the immediate edge.
Sauce is too salty: Use unsalted stock, drain the pickled peppers and check the sausage label. Do not add more salt until after the sausage and peppers are incorporated.
Chicken is not yet 165°F: Keep simmering and recheck the thickest part. Do not serve undercooked poultry even if the outside appears done.
Sausage falls apart: Cook raw links whole first and slice them after cooking. Crumbled sausage is also valid, but it creates a different texture.
Serving Ideas
This is a bold main dish, so side dishes can stay simple. Crusty bread catches the sharp pan juices; rice absorbs them without competing for attention. Roasted potatoes add substance, while steamed green beans or a plain salad provide contrast. If you want another chicken dinner with a different comfort-food format, see Easy Chicken Pot Pie With Puff Pastry. For a cheesy accompaniment rather than a second main, Creamy Stovetop Mac and Cheese is an established published option. A vegetable-heavy skillet alternative is Crispy Eggplant and Potato Breakfast Hash, which has a different meal purpose and preparation method.
Storage and Reheating
Refrigerate leftovers within two hours, or within one hour if the food is exposed to temperatures above 90°F. Divide large portions into shallow containers to cool promptly. Keep refrigerated leftovers at 40°F or below and use within 3–4 days. Reheat leftovers thoroughly to 165°F. If you will not eat the leftovers within the recommended refrigerator window, freeze them promptly in airtight containers; the peppers may soften after thawing.
For general poultry handling and cooking guidance, see the USDA FSIS safe minimum internal temperature chart. For storage timelines, consult FoodSafety.gov’s cold food storage chart. These sources are food-safety references, not claims that this recipe was physically tested.
Frequently Asked Questions
Is chicken scarparo the same as chicken scarpariello?
“Chicken scarparo” is a search variation; chicken scarpariello is the more familiar dish name. Recipes vary, but browned chicken, peppers and a tangy savory sauce are common elements.
Does scarpariello have to contain sausage?
No single home version is universal. Sausage contributes savory richness here, but it is a recipe choice rather than proof of one definitive historical formula.
Can I use boneless chicken thighs?
Yes, but cook by thermometer and expect a shorter simmer. Do not use the bone-in timing unchanged.
Can I use chicken breast?
You can, although breast meat dries out more readily. Use similarly sized pieces and remove them once safely cooked.
How spicy is this recipe?
Mild sausage and sweet cherry peppers make a gentler version. Hot sausage and hot pickled peppers increase heat considerably.
Are cherry peppers the same as bell peppers?
No. Bell peppers are sweet vegetables; jarred cherry peppers are typically smaller and pickled, with variable heat.
Can I skip the vinegar?
The pickled peppers already provide acidity, but the measured vinegar helps balance the stock. Taste before deciding to omit or increase it.
Can I make it without wine?
Yes. This version uses chicken stock and red wine vinegar rather than wine.
How do I know chicken is cooked?
Insert a clean instant-read thermometer into the thickest part without touching bone. It must reach at least 165°F.
Can I cook raw sausage in the same pan?
Yes, but it must reach the safe temperature appropriate to the meat type before serving. Browned color alone is not enough.
Can I prepare it ahead?
Yes. Cool promptly, refrigerate and reheat to 165°F. The peppers may soften and the chicken skin may lose crispness.
Can I freeze the leftovers?
Yes. Freeze promptly in sealed portions and thaw safely in the refrigerator before reheating thoroughly.
Why does my sauce taste overly sharp?
Pickled pepper brands differ. Start with the measured amount, drain well, and adjust acidity only after the sauce is hot.
What is the best pan?
A 12-inch heavy skillet with a lid gives enough room to brown chicken in batches and gently simmer it in a shallow sauce.
Editorial and Image Disclosure
This recipe has not been independently kitchen-tested. Times are planning estimates and food safety depends on the thermometer and correct ingredient handling. The accompanying food image, when approved and published, is an original AI-generated illustration rather than a photograph of a kitchen-tested batch.
Print
Chicken Scarpariello With Sausage and Vinegar Peppers
- Prep Time: 20 minutes
- Cook Time: 50 minutes
- Total Time: 70 minutes
- Yield: 4 servings 1x
- Category: Chicken & Poultry Creations
- Method: Stovetop skillet braise
- Cuisine: Italian-American
Description
Italian-American skillet chicken with cooked Italian sausage, sweet bell peppers and tangy pickled cherry peppers in a savory pan sauce. Not independently kitchen-tested.
Ingredients
2 pounds bone-in skin-on chicken thighs (4–6 pieces)
12 ounces raw Italian sausage links
1 tablespoon olive oil
1 medium red bell pepper, seeded and sliced
1 medium yellow bell pepper, seeded and sliced
1 small yellow onion, sliced
4 garlic cloves, minced
1 teaspoon dried oregano
1/2 teaspoon ground black pepper
1/2 teaspoon kosher salt initially, adjust after tasting
3/4 cup unsalted or low-sodium chicken stock
1/3 cup drained pickled cherry peppers, quartered
1 tablespoon red wine vinegar, plus up to 1 teaspoon to taste
1 tablespoon chopped parsley
Instructions
Pat chicken dry without rinsing; season with salt and pepper. Prepare vegetables separately from raw meat and wash hands and surfaces.
Brown chicken skin-side down in oil in a large skillet for 5–7 minutes, then turn for 3–4 minutes. Remove to a clean plate; it is not yet cooked through.
Cook raw sausage links in skillet, turning, until their centers reach 160°F for pork/beef or 165°F for poultry sausage. Transfer to a clean board and slice.
Pour off excess fat, leaving about 1 tablespoon. Cook bell peppers and onion 6–8 minutes; stir in garlic and oregano for 30–45 seconds.
Add stock, scrape browned fond, stir in 1 tablespoon vinegar and bring to a gentle simmer.
Return chicken skin-side up, cover loosely and simmer 20–30 minutes or until EACH piece reaches at least 165°F in the thickest part without touching bone; add stock if needed.
Add fully cooked sausage and drained cherry peppers; heat 3–5 minutes, reduce sauce uncovered if necessary, and adjust seasoning and vinegar after tasting.
Confirm chicken is at least 165°F and sausage is fully cooked; transfer to a clean platter, finish with parsley and serve. Refrigerate leftovers promptly.
Notes
Use a 12-inch skillet and brown in batches. Do not taste raw poultry or sausage. Cook poultry to at least 165°F; raw pork/beef sausage to 160°F or poultry sausage to 165°F. Refrigerate leftovers within 2 hours (1 hour above 90°F), keep at 40°F or below, use in 3–4 days, and reheat to 165°F. Check sausage/stock/pepper allergen labels. Recipe has not been independently kitchen-tested.
Nutrition
- Serving Size: 1 chicken thigh with sausage, peppers and pan sauce
Keywords: chicken scarparo recipe, chicken scarpariello, sausage, vinegar peppers