
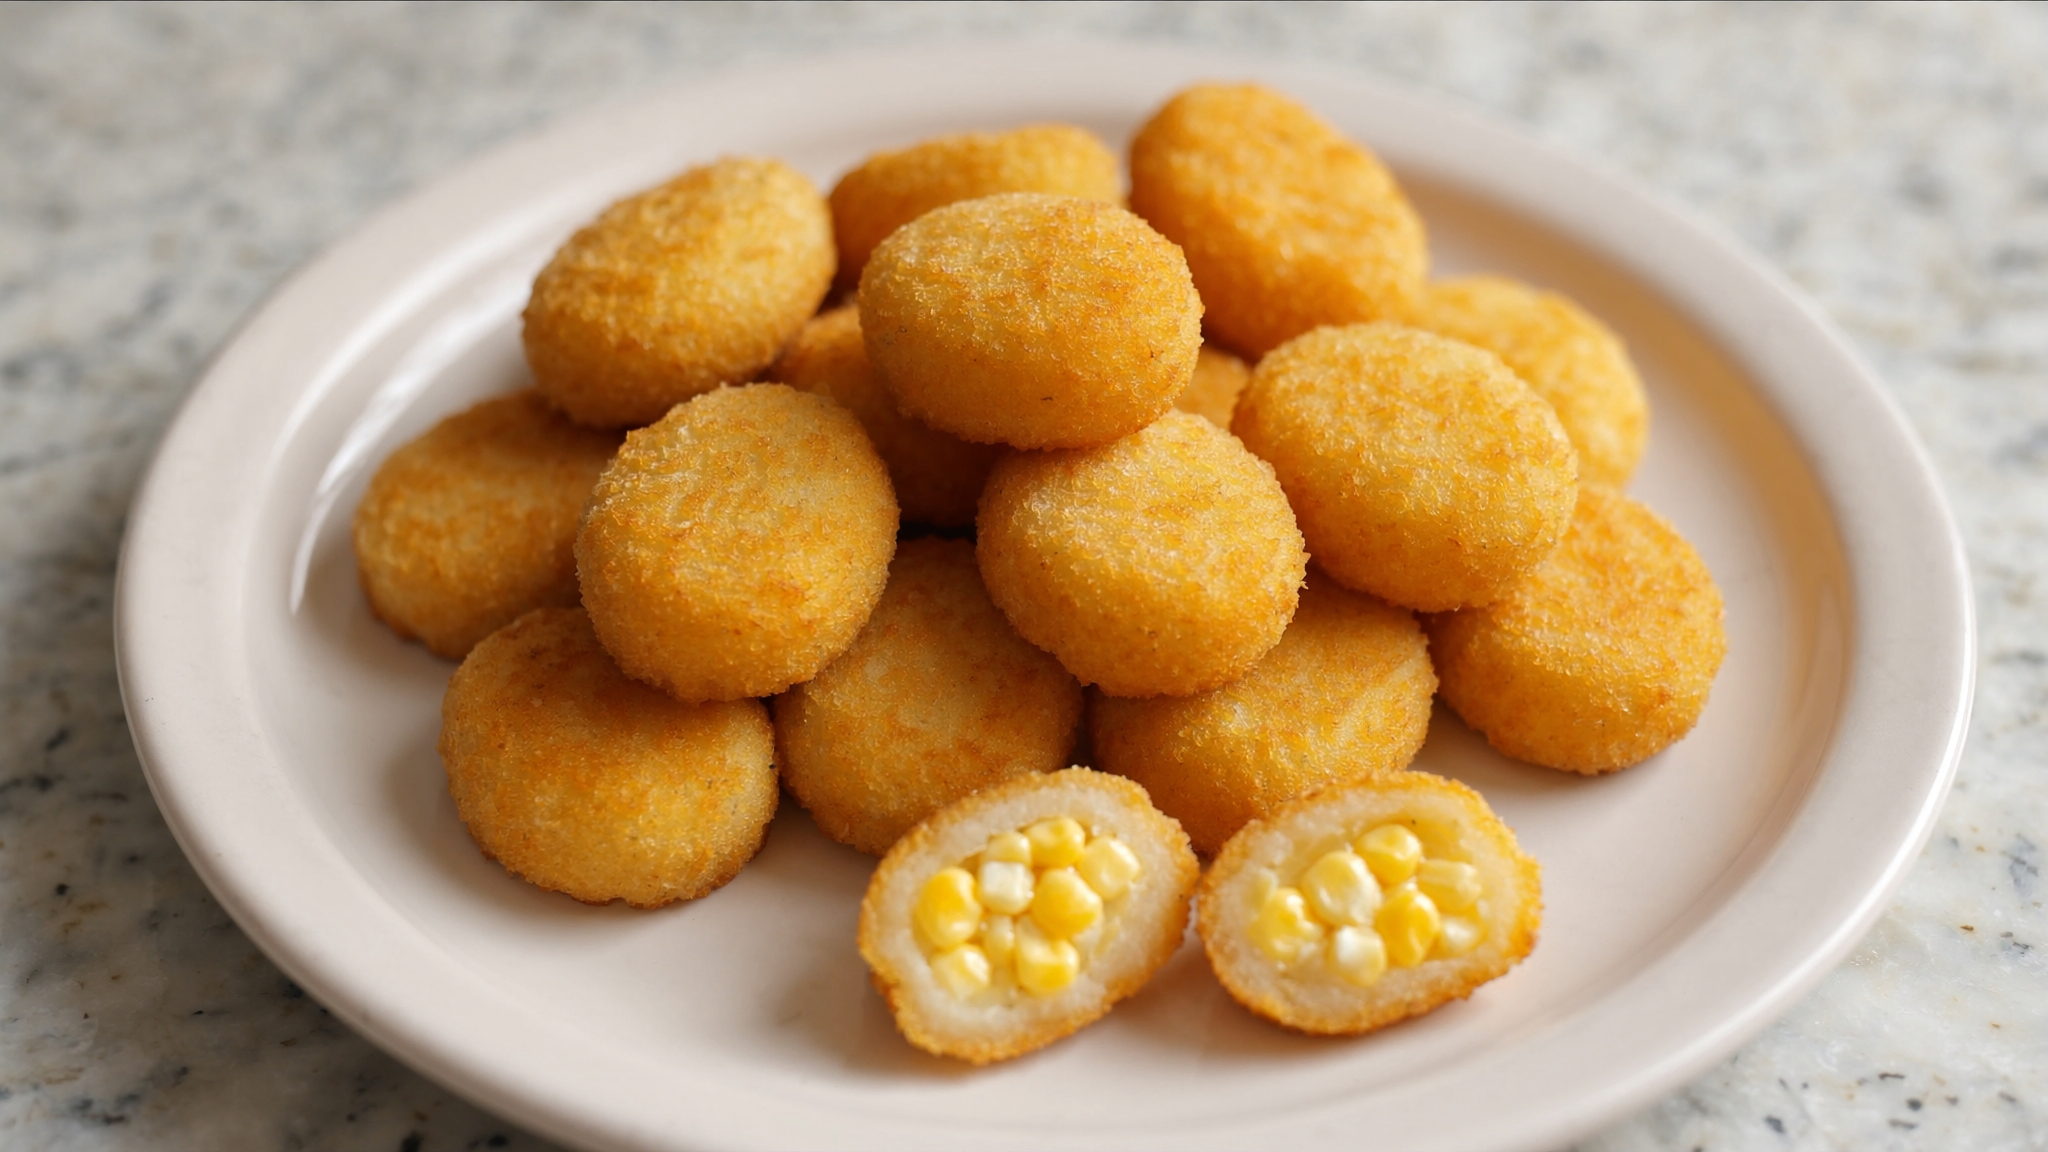
This corn nuggets recipe creates small golden battered bites with a creamy sweet-corn filling and visible whole corn kernels. The filling is frozen into small scoops before coating, giving a different result from loose corn fritters. The recipe uses a separate cornmeal-and-flour shell and carefully controlled frying around 350°F. It has not been independently kitchen-tested; verify temperature and doneness when cooking.
What this corn nuggets recipe makes
This corn nuggets recipe makes small golden battered bites with a soft sweet-corn center. Unlike loose corn fritters, the creamy filling is formed into separate scoops, frozen until firm, then coated in a distinct flour-and-cornmeal batter and fried. The outside should have a crisp, lightly textured shell and the inside should reveal recognizable yellow corn kernels in a pale creamy mixture. There is no cheddar, jalapeño, bacon, green onion, or ranch sauce in the core recipe. You can serve those other foods separately, but not silently add them to the nuggets or photos.
Why the center needs cream-style corn
Using both canned whole-kernel corn and cream-style corn provides two textures. The drained whole kernels stay recognizable in the finished center, while cream-style corn binds them together in a soft yellow mixture. A little flour helps the mixture freeze into manageable spoonfuls. This is not a mashed potato filling or a cheese nugget; the pale creaminess comes from corn. Canned products vary in sweetness and liquid content, so observe the consistency as you mix. The scoop should hold a mound on parchment long enough to freeze, rather than spreading as a thin liquid.
Measured ingredients for about eighteen nuggets
For the filling use one cup fully drained canned sweet-corn kernels, one cup canned cream-style corn, two tablespoons all-purpose flour, and one-quarter teaspoon fine salt. For the separate batter use three-quarters cup all-purpose flour, one-half cup fine yellow cornmeal, one teaspoon baking powder, one-half teaspoon fine salt, one-quarter teaspoon garlic powder, one large egg, and one-half cup whole milk. You also need suitable neutral frying oil, approximately four cups depending on the equipment and safe fill level. These quantities are an editorial formulation, not the results of a physical kitchen trial.
Buy the right canned corn products
Look for plain canned whole-kernel sweet corn and a separate can of cream-style sweet corn. Do not confuse creamed corn with a canned corn chowder that contains other vegetables or seasonings. Drain the whole kernels thoroughly using a sieve; do not drain the cream-style product because its thick liquid is needed for the filling. Measure one cup of each after opening the packages. Product labels can differ in sugar, salt, additives and allergen warnings. A combination of two products produces a more distinctive nugget interior than using loose kernels in a standard fritter batter.
Why the coating uses fine yellow cornmeal
Fine cornmeal adds a gentle grainy bite and helps the crust turn golden, while wheat flour and egg hold the batter together. Coarse cornmeal can create gritty patches on a small nugget, so fine yellow cornmeal is preferred. Baking powder makes the coating a little lighter, but too much can taste bitter. The measured salt and garlic powder season the shell subtly without hiding the sweet corn. This coating is a wet batter, not a breadcrumb or panko breading. The photographs must therefore show a thin, smooth, lightly bubbled golden outside rather than a coarse crumb crust.
Why you must use a suitably deep pot
A heavy, stable pot with enough free space above the oil is safer than a shallow pan overflowing with bubbling fat. Follow your fryer manufacturer’s fill markings, or keep a pot no more than roughly one-third full of oil. The actual volume of oil changes with the pot’s diameter and is not equal to the oil absorbed by the nuggets. Use a thermometer, long-handled utensils and a wire rack set above a sheet pan. Keep the cooking zone dry and clear, and never leave oil unattended. A deep pot does not eliminate the need for careful batch size.
How large to make each frozen scoop
Use a small scoop or two spoons to make filling portions of about one to one-and-a-half tablespoons. That size produces manageable bite-size nuggets with enough time for the center to heat through before the shell becomes too dark. A perfect commercial sphere is not required; homemade mounds can be irregular ovals. Try to keep sizes similar so they cook uniformly. Large golf-ball-size portions may remain cold inside while the coating burns. Put the scoops on parchment with space between them so they do not freeze into one mass.
Combine the filling without crushing every kernel
Stir the drained whole kernels with cream-style corn, two tablespoons flour and one-quarter teaspoon salt until the flour disappears. Use a spoon and stop once the mixture is combined. Crushing every kernel would remove the characteristic texture of the center, and additional liquid would make the mounds difficult to shape. If the mixture looks unusually watery, examine whether the whole-kernel corn was completely drained. Do not compensate by adding random breadcrumbs, cheese or mashed potato, because that would create a different food. The filling should show whole corn pieces surrounded by creamy corn.
Freeze the mounds until truly firm
Line a flat tray with food-safe parchment and spoon separate mounds of filling onto it. Freeze on a level shelf for around two to three hours, or until each portion can be lifted without collapsing. The timing depends on your freezer temperature, size of the scoops, and how much cream-style corn liquid is present. Keep the tray frozen while you prepare the frying setup; do not thaw all the mounds on the counter. This stage helps the wet batter cling and sets the filling shape. It does not make ice or water safe in hot oil.
Prepare the batter right before frying
Whisk flour, fine cornmeal, baking powder, coating salt and garlic powder in a medium bowl. Beat the egg with the milk in a second bowl and stir the wet mixture into the dry ingredients. Stop when the batter is combined and thick enough to cling to a spoon. If it runs off like water, the corn filling could become exposed during frying. Overmixing can make the shell tougher, while letting the batter sit for hours can weaken the leavening action. Prepare it shortly before the oil reaches its working temperature.
Oil temperature: use 350 degrees Fahrenheit
Heat a suitable neutral oil to around 350°F or 177°C, checking with a proper deep-fry thermometer. The USDA Food Safety and Inspection Service explains that deep-frying commonly takes place between 350°F and 375°F. Our smaller coated corn portions are formulated for the lower end of that general range. Oil that is too cool produces greasy coating; oil that is too hot can darken the shell while the frozen filling is still insufficiently warm. Do not use splashed water to test readiness or estimate temperature by smoke.
Keep water and loose frost out of hot oil
Water can flash into steam when it touches hot oil, creating dangerous splattering. Never pour water on an oil fire and never drop loose ice into a fryer. If a mound has significant surface frost, remove it carefully while keeping the filling firm, then coat it completely in batter. Keep utensils dry and use long tongs or a spider strainer to position the nuggets. The USDA deep-fat frying safety guide emphasizes caution with water and hot fat. Keep children and pets away from the cooking area.
Dip only a few pieces at a time
Remove three or four frozen mounds from the freezer at a time. Using utensils, coat every exposed surface in the thick wet batter, allow a little excess batter to drip back into the bowl, and carefully lower each piece into the oil. Do not drop a naked scoop of creamy corn into the fryer. If the filling breaks apart in the coating bowl, return it to the tray and use a different frozen portion instead of trying to repair it with fingers close to the hot pot. Work deliberately and keep the remaining mounds cold.
Small batches help the coating stay crisp
Crowding a pot with cold coated food quickly lowers the oil temperature, which can produce a greasy shell and uneven browning. Fry a small batch that can float and move without touching the pot’s rim or each other. After removing it, allow the thermometer to approach the starting temperature again. Oklahoma State University Extension notes the importance of temperature recovery during successive frying cycles. Do not increase the burner to maximum without checking the thermometer; the oil could overshoot as the pot becomes less crowded.
How long each batch may take
Small coated corn mounds may take about three to five minutes at the target oil temperature, but this is a planning range only. Gently turn pieces when one side browns more quickly. The shell needs to be golden and fully set rather than pale raw dough or nearly black. Since the coating contains raw egg and flour, cut open a test nugget to check that no wet raw batter remains and the corn filling is hot. When practical, use an instant-read thermometer to verify the center reaches around 165°F before serving. Nugget size and freezer conditions change the timing.
What to do if the crust browns too fast
A dark shell with a cool interior suggests the oil may be too hot, the portion may be too large, or the batter may be excessively thick. Check the thermometer, reduce the heat when needed, and use smaller frozen scoops in the next batch. Do not scrape a burnt outside away and call a cold center safely cooked. A first-batch test is useful because cooking conditions differ between a small home pot and a commercial fryer. Adjust the method based on real results instead of assuming every nugget will cook perfectly in exactly three minutes.
Check the first nugget before frying the rest
When the first piece is cooked, lift it out using a suitable strainer and drain briefly on a rack. Allow it to cool enough to handle, cut it open and examine the inside. You should see pale yellow creamy corn and whole kernels surrounded by a set cooked shell. If the inside is still cold or the batter sticky, alter batch size and temperature and continue cooking the remaining pieces safely. A visual appearance of gold on the outside is not a sufficient test of the center. This is particularly important when cooking from a frozen filling.
Drain on a rack for the best texture
Set a wire rack over a baking tray before you begin frying. Use a spider strainer to transfer golden nuggets onto the rack in one layer. Air can circulate underneath, preventing steam from softening the lower surface. Stacking hot pieces in a deep bowl may cause their exteriors to become damp even if they left the fryer crisp. If you use a paper towel to catch initial oil, transfer the nuggets to a rack soon afterward. Keep a safe distance from the fryer when moving the tray and do not try to hold hot nuggets with bare hands.
How the finished corn center should look
Break a nugget in half to reveal whole sweet-corn kernels embedded in a soft, creamy yellow filling. The center should not be stretchy melted cheese, white sauce with pasta, mashed potatoes or raw batter. The shell is golden and moderately thin, with subtle cornmeal texture and small bubbles. The pieces are irregular little ovals rather than perfectly identical factory shapes. Photographs that show cheddar strings, green pepper pieces, bacon or a heavy breadcrumb crust would misrepresent the recipe. One or two broken-open nuggets help readers understand the unique filling.
Serving warm without unnecessary toppings
Serve the cooked nuggets after they have cooled just enough to eat safely. A simple white platter of golden pieces makes the sweet corn the focus. A dipping sauce can be offered in a separate bowl if desired, but it is not part of this Tasty recipe or the two source photos. Because the filling is creamy, check temperature before giving one to a child. Do not hold the fried food on a party buffet for an extended period at unsafe temperatures. The best crunch is usually shortly after draining, not hours after frying.
Corn nuggets versus bacon-cheese corn fritters
MySavorista already publishes cheesy bacon jalapeño corn fritters. That dish combines kernels with an enriched batter and adds distinctly savory bacon, cheese and peppers. Here the plain sweet-corn filling is separately frozen, coated, and fried, with no cheese or meat. Both are party appetizers, but the technique, ingredient identity and cut-open appearance differ. This distinction matters for readers and search engines: calling a cheesy skillet fritter a classic creamy corn nugget would not fulfill the same recipe intent.
A spicy appetizer for a separate plate
For guests who want heat and melted cheese, the site’s cheesy bacon jalapeño poppers are a separate appetizer with another ingredient list and method. They can share a buffet with these sweet corn nuggets, but they should not be stirred into the corn filling just to make the photograph look more dramatic. A plain corn nugget works for guests who do not want pepper heat, though anyone with food allergies still needs to review wheat, milk and egg ingredients. Plan and label different dishes separately at gatherings.
Another game-day option without corn
The loaded cheesy bacon potato skins on MySavorista offer a crisp potato-based snack for people who enjoy richer toppings. Unlike those skins, corn nuggets have a soft kernel filling protected by batter; the two preparations should not borrow each other’s cooking times or ingredient quantities. The link is an alternative suggestion rather than part of the corn nugget method. If serving both, use separate trays and check that guests with dietary restrictions understand which food contains meat, cheese, wheat and eggs.
Creamy bites should stay a distinct recipe
Another appetizer in the collection is cheesy spinach artichoke dip bites. Their creamy center comes from dairy and vegetables instead of sweet corn, and their preparation differs substantially. Mentioning this dish helps readers explore a different option, but this article does not include artichokes, spinach, or cheese in the nuggets. We keep the ingredients narrow so that a family can shop once, follow the Tasty card, and recognize exactly what should appear on the table.
Could you use fresh or frozen corn?
For a future variation, safely thawed frozen corn kernels or cooked fresh kernels may replace the canned whole kernels if drained thoroughly, but the texture and moisture can change. That variation should be tested separately rather than described as guaranteed identical. The main recipe intentionally uses canned products for a predictable measure. Never stir still-frozen loose kernels with large ice crystals into the filling and assume the later hot-oil stage will be safe. Excess moisture is one of the central challenges when coating and frying a creamy frozen interior.
Why the air fryer is not an exact substitute
A wet flour-and-cornmeal dipping batter needs rapid contact with hot frying oil to set its shape. In an air fryer, the batter may drip through the basket before it forms a shell, exposing the soft corn filling. We therefore do not claim that the same mixture can simply be cooked in an air fryer for an identical result. An air-fryer-specific nugget would need a different coating, often with a crumb structure. That would be a distinct recipe and would require physical testing, not a casual temperature conversion from this deep-fried formulation.
Why the oven is not listed as a tested method
The oven also heats a coating more gradually than immersion in hot oil, and the frozen filling could soften before the batter forms a closed shell. Baking these exact mounds at a guessed temperature could yield flattened corn pancakes rather than nuggets. Because the recipe is editorial and untested, we avoid offering a fictitious oven time as if it were proven. Readers seeking a baked snack can explore purpose-built recipes with different binders and coatings. This page documents a single, reasonably coherent deep-frying procedure without promising a flawless conversion to other appliances.
Preventing leaks in the fryer
Leaks typically happen when scoops have thawed too far or the batter has gaps. Keep the bulk of the filling frozen while coating only a few pieces. Use a thick batter that visibly covers the whole mound. If a portion cracks, do not patch it above hot oil; return it to the freezing tray and take another firm scoop. Avoid dropping the food from height and use dry utensils. If the oil begins foaming excessively or a piece bursts, stop adding new nuggets, reduce heat appropriately and restore a safe condition before continuing.
The most common cause of soggy crust
Oil below the proper temperature can saturate a wet coating before it browns. Overcrowding the fryer lowers temperature further, while stacking finished nuggets traps steam. Use a thermometer, cook in small batches and drain in one layer. A thick batter that clings is preferable to a very thin mixture. Do not add more milk because the first nugget looks dry; check whether it was actually overcooked instead. Texture is influenced by oil temperature, coating thickness, moisture and service timing together, so no single shortcut fixes every soggy batch.
Making the centers ahead for a party
You may shape the filling on parchment in advance and keep it safely frozen, then transfer firm mounds into a clean freezer-safe container with separation between layers. Prepare the raw-egg batter shortly before frying rather than leaving it unrefrigerated for hours. This divides the work between a quiet preparation stage and a carefully supervised frying stage. Keep the frozen centers cold until they are needed, and never use a delayed-start fryer. Having utensils, a rack and a thermometer prepared before guests arrive is more helpful than trying to cook while searching for equipment.
Refrigerating cooked leftovers promptly
Let finished nuggets cool enough to pack safely, then transfer leftovers promptly to clean shallow containers in the refrigerator. They contain egg and milk in the cooked coating and should be treated as perishable food. The FoodSafety.gov cold-storage chart offers general guidance about prepared leftovers. Reheat a portion thoroughly and expect the shell to be less crisp than when freshly fried. Do not leave a bowl of warm nuggets on a table all afternoon and assume the fried crust protects the creamy center.
A note about freezing cooked nuggets
Fully cooked nuggets can be tried as frozen leftovers if cooled safely and packaged appropriately, but the crust and corn filling may change texture after thawing. We have not tested the result of this specific freezing procedure, so it would be misleading to guarantee perfect crispness. A small trial batch can help assess whether your household likes the reheated result. Avoid sealing steaming-hot pieces in an airtight container where condensation will soak the crust. Thaw and reheat using appropriate food-safety practices, not by leaving nuggets at room temperature for many hours.
How to scale the recipe for a larger crowd
To make approximately thirty-six small pieces, double filling and coating quantities while keeping each scoop near the original size. Do not double oil depth in the same pot automatically; the safe amount depends on the equipment’s fill line. Fry the same number of pieces per batch, giving the oil time to recover. Work with extra trays of frozen filling instead of placing everything on the counter. Larger batches require more active cooking time, but that is safer and more predictable than making enormous corn balls with an underheated center.
Allergen disclosure and ingredient checks
The coating contains wheat, egg and milk, and the filling uses wheat flour. Check every package label because cream-style corn and other canned products may vary in added ingredients or cross-contact warnings. This recipe is not gluten-free, dairy-free or egg-free as written. Though no bacon, cheddar, peanuts or nuts are added, a shared kitchen or fryer may have allergen cross-contact from other dishes. If cooking for someone with a diagnosed allergy, verify equipment and ingredients rather than relying solely on this descriptive article. No nutrition totals are invented.
How to photograph the correct nuggets
The finished-food hero should show golden bite-size battered nuggets on a simple plate, with two pieces broken open to reveal pale yellow creamy corn and distinct whole kernels. The separate Tasty-card photo should use a different composition while depicting the same food. Synthetic cheese pulls, jalapeños, bright green specks, ranch dipping cups, breadcrumb lumps or doughnut holes would be visual recipe failures. Both images must be original independent native 2K sources, checked for text, trademarks, QR-like artifacts and accurate food anatomy before any WordPress publication.
Transparency about testing and search visibility
This recipe is an original editorial formulation informed by existing culinary preparations and frying safety literature. It has not been independently kitchen-tested or physically cooked and tasted by MySavorista editors. Nugget yield, freezing duration and frying time are estimates requiring adjustment for actual ingredients, freezer and equipment. Any generated images are illustrative, not evidence that a team photographed a kitchen trial. We do not assert precise oil absorption, calories or guaranteed Google Discover placement without appropriate measurements. Useful, honest instructions matter more than inflated claims.
Frequently asked questions about corn nuggets
What are corn nuggets made from?
A creamy filling of canned whole-kernel sweet corn and cream-style corn with a little flour, coated in a separate batter of flour, fine cornmeal, egg and milk.
Why freeze corn nugget filling?
It is too soft to handle fresh; firm frozen scoops can be coated completely in a thicker batter before careful frying.
How are corn nuggets different from fritters?
These have a separately frozen creamy corn center and a distinct outer batter, whereas ordinary fritters often blend corn directly into batter.
What oil temperature is best for corn nuggets?
Aim for approximately 350°F, using a deep-fry thermometer and small batches to keep the temperature from falling drastically.
How long should corn nuggets fry?
About 3–5 minutes for small portions, depending on size and equipment. Check a test nugget for a fully cooked shell and hot center, ideally around 165°F.
Can I use canned corn?
Yes. Use drained whole kernels plus undrained cream-style corn, measured separately, as specified in the recipe.
Can I use frozen corn instead?
Thaw and drain it thoroughly if replacing whole kernels, but expect possible moisture and texture changes; the main formulation uses canned products.
Why do my nuggets leak in the oil?
The frozen portion may have softened too much, the coating may be thin, or creamy filling may be exposed. Work in small batches and cover each scoop fully.
Are corn nuggets cheese-filled?
Not in this version. The creamy yellow interior comes from cream-style corn and intact sweet corn kernels, without cheddar or mozzarella.
Can I air-fry them instead?
This wet batter is not developed for air frying and may drip through the basket. Choose a method-specific recipe with a stable coating.
Can the corn centers be prepared ahead?
Yes. Freeze small mounds ahead and keep them separated, then prepare the batter shortly before frying.
How should I store leftovers?
Refrigerate promptly in clean shallow containers and reheat thoroughly. The coating may lose some crunch compared with freshly fried nuggets.
Print
Corn Nuggets Recipe: Crispy Golden Sweet Corn Bites
- Prep Time: 20 minutes active preparation; 2–3 hours freezer time
- Cook Time: About 20–30 minutes including oil heating and small frying batches
- Total Time: Roughly 3–4 hours including freezing, depending on equipment
- Yield: About 18 small nuggets, approximately six appetizer portions 1x
- Category: Global Flavors & Street Food
- Method: Freeze corn centers; dip in batter and deep-fry in small batches
- Cuisine: American family party snacks
Description
Classic crispy golden corn nuggets with a creamy yellow sweet-corn filling made from canned whole kernels and cream-style corn, dipped in a separate cornmeal batter.
Ingredients
1 cup canned whole-kernel sweet corn, drained thoroughly (filling)
1 cup canned cream-style sweet corn, undrained (filling)
2 tbsp all-purpose flour (filling binder)
¼ tsp fine salt (filling)
¾ cup all-purpose flour (coating)
½ cup fine yellow cornmeal (coating)
1 tsp baking powder (coating)
½ tsp fine salt (coating)
¼ tsp garlic powder (coating)
1 large egg (coating)
½ cup whole milk (coating)
approximately 4 cups refined neutral frying oil, or the appropriate safe amount for your pot or fryer
Instructions
1. Mix 1 cup fully drained canned whole-kernel sweet corn with 1 cup undrained cream-style corn, 2 tbsp all-purpose flour and ¼ tsp fine salt. The filling should be creamy but show intact yellow kernels.
2. Line a flat tray with food-safe parchment. Scoop around 1–1½ tbsp of filling per mound to make approximately 18 separate small pieces. Freeze level for about 2–3 hours or until each mound is firm enough to lift without collapsing.
3. Whisk ¾ cup all-purpose flour, ½ cup fine yellow cornmeal, 1 tsp baking powder, ½ tsp salt and ¼ tsp garlic powder in a bowl. Beat 1 egg with ½ cup milk separately, then mix to make a thick batter that clings to a frozen mound.
4. Prepare a wire rack over a sheet pan. Carefully heat neutral oil in a suitable deep heavy pot or fryer to about 350°F (177°C), using a deep-fry thermometer. Respect manufacturer fill lines; for a pot keep oil well below one-third of its height. Keep children away and never introduce water or loose ice.
5. Remove only 3–4 frozen mounds at a time. Remove significant loose surface frost safely and coat every side of each mound with thick batter. Lower each coated piece gently into the hot oil using appropriate dry utensils.
6. Fry small batches for approximately 3–5 minutes, turning gently, until golden and fully cooked. Monitor oil temperature. Check a test nugget’s crust for no raw batter and the center thoroughly heated, ideally reaching about 165°F. Adjust for actual equipment and size.
7. Transfer cooked nuggets to the wire rack in one layer to drain without trapping steam. Allow the oil to return near 350°F before frying another small batch. Keep the unused filling frozen until needed.
8. Allow cooked nuggets to cool briefly enough to eat safely. Cut one open to confirm creamy pale yellow corn with recognizable whole kernels inside its set golden crust, then serve promptly. Refrigerate leftovers promptly and reheat thoroughly.
Notes
Contains wheat, egg, and milk; check labels and cross-contact. Corn centers must be firm and fully covered with thick coating before frying; do not place loose frost/ice or water into hot oil. Use a thermometer near 350°F and check a test nugget’s coating and center are safely heated, around 165°F. No cheese, bacon, jalapeños, onions, herbs or dip in photographed main dish. NOT independently kitchen-tested; time and yield editorial estimates, images illustrative, no invented calories or oil absorption.
Nutrition
- Serving Size: About 3 corn nuggets per appetizer portion, excluding optional dip
Keywords: corn nuggets recipe, fried corn nuggets, crispy sweet corn bites, cream style corn nuggets