
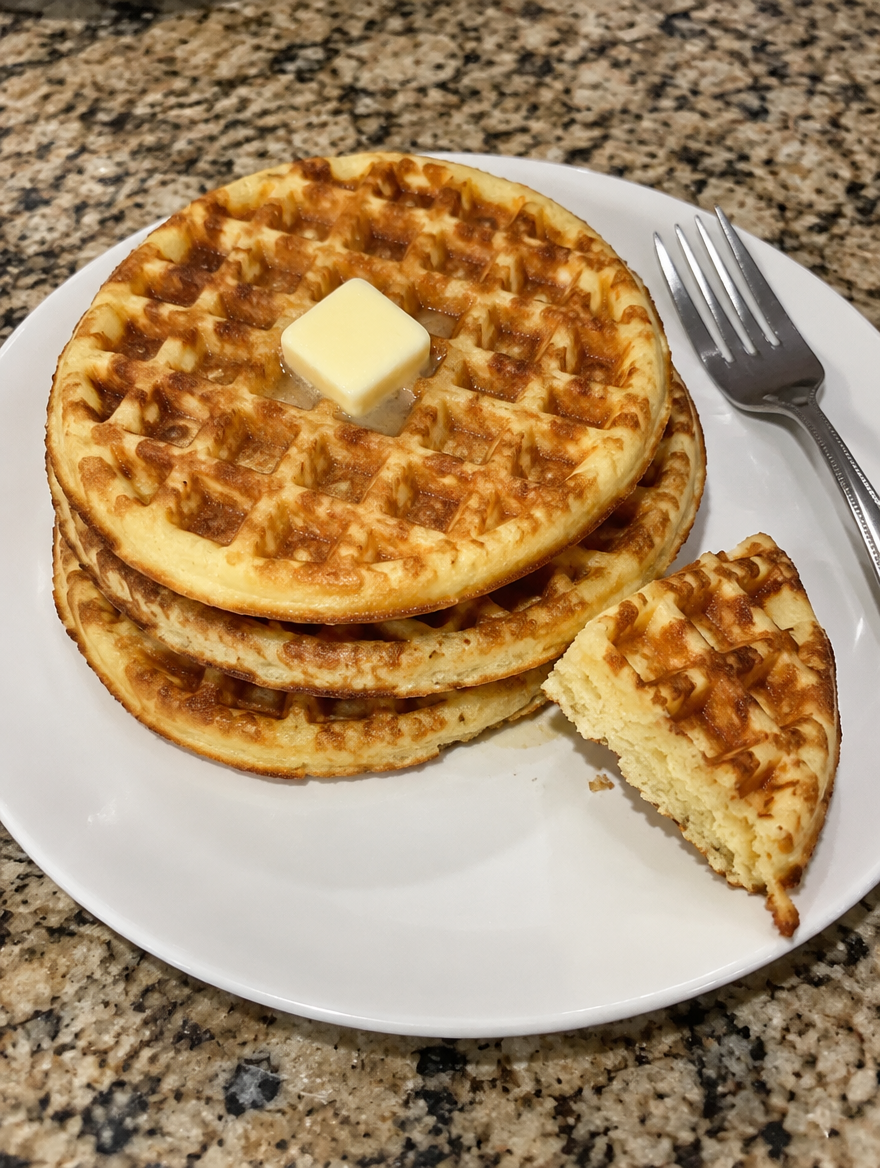
A simple waffle recipe should give you golden breakfast waffles with a familiar square grid, crisp edges and a tender middle. These easy crispy homemade buttermilk waffles use regular pantry flour, a little cornstarch, cultured buttermilk, two eggs and melted butter. You make the batter in two bowls and cook it in a preheated waffle maker. No box mix, yeast, overnight proofing, whipped egg whites, cream cheese or fancy topping is necessary.
Quick answer: Whisk 2 cups (250 g) all-purpose flour, ¼ cup (32 g) cornstarch, 2 tablespoons (25 g) granulated sugar, 1 tablespoon (12 g) baking powder, ½ teaspoon baking soda and ¾ teaspoon fine salt. In another bowl whisk 2 large eggs, 1¾ cups (420 ml) cultured buttermilk, 6 tablespoons (85 g) melted slightly cooled unsalted butter and 2 teaspoons vanilla. Fold wet into dry gently; small lumps are fine. Rest 5 minutes while the waffle iron preheats. Cook in batches following the manufacturer’s fill amount, often 4–6 minutes per batch, until golden and fully set inside. Cool briefly on a rack for crisp edges. Yield is approximately eight standard waffles or four large Belgian waffles, depending on maker. Plan 15 minutes preparation and 20–35 minutes cooking, about 35–50 minutes total. Optional small pat of butter for serving; no syrup or fruit is required.
Editorial disclosure: This original AI-assisted recipe has not been independently kitchen-tested. Times and texture are estimates rather than a physically tested batch. Waffle machines vary greatly in heating and batter volume. The food photo is an AI-generated illustration, not evidence of a real waffle-maker trial; no laboratory nutrition results or confirmed universal yield are claimed.
Why This Homemade Waffle Recipe Is Different
Many waffles on MySavorista are intentionally sweet or savory specialty dishes: cinnamon-roll waffles, maple-bacon stuffed waffles and sweet-potato versions. This page is the plain, classic buttermilk base for breakfast, without fillings, frosting, bacon, cinnamon swirl or a crumb topping. The goal is a method that a home cook can follow with common ingredients and one familiar kitchen appliance.
The dry mixture has flour for structure, cornstarch for a lighter crisp texture, sugar for a little browning, baking powder and baking soda for lift, and salt for flavor. The wet mixture contributes dairy, eggs, butter and vanilla. You do not need to separate eggs or beat whites into stiff peaks. Avoid long vigorous mixing once liquid touches flour so the cooked waffles remain soft inside instead of turning dense.
Because waffle irons have different plate depths, this recipe cannot prescribe one universal scoop of batter. Start with the amount listed in your particular manufacturer’s manual. A thin standard iron may make eight waffles while a deep Belgian iron may make fewer large ones. The ingredients stay constant, but the piece count and cooking time depend on the equipment.
Exact Ingredients and Their Functions
Use a kitchen scale where possible. The amount of flour packed into a measuring cup varies, and excess flour changes how easily batter spreads.
- 2 cups (250 g) all-purpose wheat flour, not self-rising flour.
- ¼ cup (32 g) cornstarch, a fine white starch powder; not coarse cornmeal.
- 2 tablespoons (25 g) granulated sugar, to balance buttermilk and support browning.
- 1 tablespoon (12 g) baking powder, a separate leavener from baking soda.
- ½ teaspoon (about 2 g) baking soda, to react with acidic cultured buttermilk.
- ¾ teaspoon (about 4 g) fine salt, mixed through the dry ingredients.
- 2 large eggs, whisked whole with the liquid ingredients.
- 1¾ cups (420 ml) cultured buttermilk, measured according to carton guidance.
- 6 tablespoons (85 g) unsalted butter, melted but cooled slightly before it meets raw eggs.
- 2 teaspoons vanilla extract, for light breakfast flavor.
- A little neutral oil or butter for greasing the waffle plates, only if your machine instructions advise it.
- Optional small pat of unsalted butter to serve, about 1 teaspoon per plate, as illustrated.
This formula contains wheat, dairy and eggs. It is not gluten-free, milk-free, egg-free or vegan. Check packaging and cooking surfaces for allergy-related cross-contact if cooking for someone with a medically important allergy. Cornstarch does not eliminate gluten from a batter that also contains 250 grams of wheat flour.
There is no maple syrup, sliced banana, berry sauce, powdered sugar, bacon or whipped cream in the core recipe. Those can be separate serving choices, but they should not be described as ingredients that are required for the illustrated plain waffles.
What Cultured Buttermilk Adds
Buttermilk supplies moisture, acidity and a mild tang. Acid helps baking soda react, while baking powder also provides lift. The measured 420 ml is part of the batter’s hydration; adding a large unmeasured amount of milk because it looks thick can make the waffles soft or prone to overflow.
Commercial cultured buttermilk varies by brand, and some cartons need shaking before use. Follow packaging directions and measure the liquid rather than assuming one particular carton size equals the recipe. If the batter seems too thick, first check whether you accidentally packed more than 250 grams of flour into the bowl.
A direct ordinary-milk substitution is not validated in this editorial formulation, because milk does not have identical acidity. For a distinct breakfast without dairy, our fluffy dairy-free pancakes with oat milk use a separate ingredient approach and a skillet rather than a waffle iron.
Cornstarch, Butter and Crispy Edges
A little cornstarch changes the flour blend and is intended to encourage a less bread-like crust. Heat and moisture removal are still essential: cornstarch alone cannot make a waffle crisp if it is removed pale and barely set. The iron needs to be properly preheated, and each batch must cook until the middle is done.
Melted butter adds flavor and helps with browning and release. Cool the butter slightly before adding it to eggs and cold buttermilk; very hot butter can create cooked egg flecks. If small butter specks re-solidify in the cold liquid, they may melt again during cooking, so do not try to fix them by heating the whole raw-egg bowl aggressively.
Sugar is deliberately modest at 25 grams for the batch. This is a breakfast base that may be eaten plain or with optional butter, not a cookie-like dessert waffle. Adding a much larger amount of sugar changes surface browning and can make the grid darker before the center sets.
Picking and Preparing Your Waffle Iron
A round standard iron and a Belgian iron are both suitable in principle, but their depths, heating patterns, fill limits and instructions differ. Preheat the machine completely according to its manufacturer. If its cooking plates need a light coating of oil, apply it as instructed; if the nonstick manual says not to grease, follow that instead.
Never fill the plates beyond the recommended amount. Waffle batter rises and spreads as the lid closes, and an overfilled machine can send hot batter out of vents onto the counter. Start conservatively for the first waffle and adjust within your machine’s allowed range. Do not use a metal knife or fork on delicate nonstick plates.
A waffle maker can eject hot steam when opened. Keep fingers away from hinge and steam vents, use an insulated handle and never immerse the plugged-in electric body in water. Let it cool and follow its cleaning instructions after breakfast.
Mixing Batter Without Making Tough Waffles
Whisk flour, cornstarch, sugar, baking powder, baking soda and salt before combining with wet ingredients. Distributing leaveners evenly avoids little pockets with too much baking powder and other sections with too little. In the second bowl, whisk eggs, buttermilk, melted cooled butter and vanilla.
When wet is added to dry, fold gently until no large dry patches remain. A few small lumps are normal. Long aggressive mixing after flour gets wet can develop gluten and produce a tougher, chewier waffle. The batter should pour slowly and spread when the heated lid closes, not become a stiff dough.
Allow about five minutes of rest while the machine finishes preheating. This is a brief hydration rest, not a yeast rise. Because the leaveners start reacting as soon as liquid enters, don’t leave the mixed batter unrefrigerated for hours. If preparing the night before, pre-measure dry ingredients and keep the perishable wet ingredients safely chilled and separate.
How to Make Easy Crispy Buttermilk Waffles
1. Preheat the Waffle Maker
Plug in the waffle maker and allow it to reach the operating temperature specified by its manufacturer. Prepare a clean cooling rack to hold finished waffles. Use a small amount of grease on the cooking plates only if your manual recommends it. Make sure the rack and serving plate never touch raw egg-and-flour batter.
2. Combine the Dry Ingredients
Whisk together 250 g all-purpose flour, 32 g cornstarch, 25 g sugar, 12 g baking powder, ½ teaspoon baking soda and ¾ teaspoon fine salt. Scrape the corners of the bowl and break up visible cornstarch clumps. Weighing flour is preferable to scooping directly from a compressed bag.
3. Whisk the Wet Ingredients Separately
In a second bowl whisk 2 eggs, 420 ml cultured buttermilk, 85 g melted slightly cooled unsalted butter and 2 teaspoons vanilla. Make sure the butter is not so hot that it cooks the eggs. The mixture should look generally combined rather than containing streaks of unmixed egg white.
4. Fold Wet Into Dry Gently
Pour the liquid over the dry mixture and fold with a whisk or spatula just until no significant dry patches remain. Small lumps are acceptable; do not beat for several minutes in pursuit of a completely smooth batter. Do not taste the raw mixture because raw flour and eggs can contain harmful germs.
5. Rest Five Minutes and Measure for Your Iron
Let the batter stand for roughly five minutes while the waffle maker heats. Use the manufacturer’s batter amount or fill indicator for your particular appliance. Start with less batter than you think if the iron is small; do not push the lid down against overflowing batter.
6. Cook Waffles Until Fully Done
Close the lid and cook each portion according to the appliance instructions, often around 4–6 minutes per batch. Look for a golden grid and a center that is fully cooked with no wet raw batter. Reduced steam may be a useful cue but is not proof of safety by itself. Do not repeatedly open too early and tear a waffle that is still setting.
7. Keep the Finished Waffles Crisp
Transfer each fully cooked waffle onto the clean wire rack in a single layer. This lets steam escape rather than condense on the underside. For a brief serving hold, an oven-safe rack in a low oven around 200°F (95°C) can keep them warm, provided your equipment is rated for that and you monitor it. This optional hold does not replace complete waffle-iron cooking.
8. Serve and Handle Leftovers Safely
Serve plain, or add a small optional pat of butter. The batch makes approximately eight standard waffles or four larger ones, depending on equipment, divided into around four breakfast portions. Move leftover cooked waffles promptly to clean, shallow containers. Refrigerate at 40°F (4°C) or colder within two hours, or one hour above 90°F ambient, and reheat fully before eating.
How Many Waffles Does the Recipe Make?
The exact count depends on how much batter the plates hold. Thin round irons may produce more individual waffles than deep-pocket Belgian irons. The estimate is eight standard pieces or four large pieces, but do not treat that as an exact yield tested in a particular model.
If the waffle maker produces one small waffle at a time, the total cooking period can extend beyond 20 minutes. If a dual iron cooks two at once, the process may be shorter. The 20–35-minute cooking range reflects variation in typical household appliances rather than a stopwatch measurement.
For a four-person breakfast, distribute by actual size: about two standard waffles each or one large Belgian-style waffle each. If your iron produces tiny waffles, portion them differently rather than making inaccurate universal serving claims.
How to Avoid Waffles That Become Soggy
Hot waffles release steam. When they are stacked immediately, that vapor condenses and softens the grid surface. The simple fix is to put finished waffles on a rack, not directly onto a sealed or wet plate. Move them to the serving plates shortly before eating.
Another common issue is undercooking. A very pale waffle can look cooked outside but remain soft or wet within the thicker grid portions. Allow the iron enough time and verify the center is set. A model’s indicator light is useful but does not replace checking your first batch.
If the iron was overfilled, the grid may cook unevenly. Use the recommended portion and avoid pouring more batter in an attempt to create a bigger waffle. Adjust the machine’s heat setting within manufacturer instructions rather than improvising very high temperatures.
Why Waffles Sometimes Stick
A waffle that tears when you lift the lid may not have finished setting. Give it a little more time if the appliance allows. A clean properly preheated iron also matters. Some irons need oil, others rely on nonstick coating, and some older surfaces become less reliable with wear.
Never scrape a nonstick plate with a sharp metal utensil if the manufacturer warns against it. Use approved heat-resistant tools and allow the equipment to cool before cleaning. Burned-on residue may need manufacturer-specified cleaning rather than an overnight soak of the electrical unit.
If repeated batches stick, verify the butter measurement, preheat, fill volume and plate condition. Don’t solve sticking by flooding the machine with additional oil, which may cause splattering and change the waffle surface.
Troubleshooting Batter and Texture
Batter too thick: confirm flour was measured by weight or gently spooned into cups. Adding a large quantity of extra flour may turn it into a stiff dough. A small difference in buttermilk viscosity can also matter.
Batter too thin: double-check whether all flour and cornstarch were added. Thin batter overflows easily and may not hold its grid structure.
Waffles too tough: reduce vigorous mixing after combining wet and dry ingredients. The gluten-forming flour needs only enough stirring to hydrate.
Waffles too dark: the iron may be too hot or cooking too long. Adjust within manufacturer guidance and inspect earlier without opening during the raw setting stage.
Waffles too pale: increase appropriate cooking time or preheat fully. A little more color often means more moisture has escaped from the exterior.
Waffles sticking: follow the appliance greasing instructions and avoid lifting before the waffle is set. Clean residue from the cooled machine.
Heavy centers: confirm baking powder was measured correctly and isn’t stale, mix leaveners through all the flour, and do not turn the batter into a stiff paste by adding too much flour.
Food Safety: Never Taste Raw Waffle Batter
Raw flour and raw eggs can carry disease-causing bacteria. The CDC guidance on raw flour and dough specifically advises against eating uncooked batter and recommends washing hands and tools after contact with raw flour or eggs. The FDA flour-safety guidance gives similar advice. Mix and cook, but do not sample the batter while judging its sweetness.
Keep raw batter and the batter-covered whisk away from the cooked-waffle rack. Wash counters, bowls and utensils carefully before they touch ready-to-eat food. Refrigerate eggs and buttermilk according to their labels and don’t leave a raw dairy-and-egg mixture out for a long breakfast service.
The iron must cook waffles fully. Brown color on the outside alone does not prove the center is cooked, especially if the maker was overfilled. Do not serve a waffle with wet raw batter still visible in its middle.
Storing and Reheating Homemade Waffles
Once cooked, let waffles steam briefly on a clean rack and then refrigerate leftovers promptly. According to USDA guidance on handling leftovers, perishable cooked food should enter refrigeration within two hours, or within one hour in air hotter than 90°F. Keep the refrigerator at or below 40°F (4°C), and aim to use properly stored leftovers within 3–4 days.
The USDA reheating guidance recommends heating leftovers thoroughly to 165°F (74°C). A toaster or oven can help crisp the waffle surface, but use a suitable appliance and ensure the interior becomes fully hot. Never place paper wrapping, plastic packaging or buttered foil into an ordinary toaster.
Fully cooked waffles can also be frozen in appropriate packaging, although this specific recipe has not been independently tested for a particular frozen shelf life or exact thawed texture. Avoid letting thawed cooked waffles sit unrefrigerated for hours.
Related MySavorista Breakfasts
Our cinnamon roll waffles with cream cheese drizzle are a sweet specialty waffle with a distinct topping and technique. They are not the same as the plain buttermilk waffle batter here.
For a more elaborate savory brunch, savory maple bacon stuffed waffles use fillings and meat, neither of which belongs in this classic plain-waffle recipe or its illustrative photo.
The savory sweet potato and bacon waffles have a different moisture balance and flavor profile. Their ingredients cannot be added casually to this recipe without changing batter consistency.
If your household needs a non-dairy breakfast idea, fluffy dairy-free pancakes with oat milk are another published recipe. Waffles and pancakes use different equipment; the two formulations should not be assumed interchangeable.
Frequently Asked Questions
Can I make these in a Belgian waffle maker?
Yes, though deeper plates need different batter quantities and may require more cooking time. Expect fewer large waffles from the same recipe. Follow the machine’s fill and heat instructions.
How do you make waffles crisp outside and fluffy inside?
Preheat thoroughly, use the measured flour-and-cornstarch blend, avoid overmixing, cook until golden and fully set, and let steam escape on a rack before serving.
Do I have to whip the egg whites separately?
No. This recipe uses two whole large eggs whisked with buttermilk and butter. It deliberately avoids a separate whipping stage.
Can I swap milk for buttermilk?
The ingredient formula uses cultured buttermilk and baking soda. Regular milk has a different acidity, and an equal swap has not been physically tested in this formulation.
Is cornstarch the same as cornmeal?
No. Fine cornstarch is used here; coarse cornmeal would change the texture. Use 32 grams of cornstarch rather than substituting a granular corn product.
What should the batter look like?
It should be pourable but not watery, with a few small lumps acceptable. Large pockets of dry flour should be incorporated, but beating it perfectly smooth is unnecessary.
How much batter should I pour in?
Use your waffle maker’s manufacturer-recommended volume. Because iron sizes differ, a universal cup measurement could overflow smaller machines.
How long does each waffle take?
Many irons take approximately four to six minutes per batch, but the appliance instructions and actual golden, cooked interior are the controlling cues.
Why are my waffles pale?
The machine may not have reached full operating temperature or the cycle may have ended early. Follow its preheating and cooking guidance.
Can I refrigerate the raw batter overnight?
This formulation has not been independently kitchen-tested after an overnight hold. Raw egg-and-buttermilk batter must be kept cold, and leavening may lose effectiveness after mixing. Pre-measure dry ingredients instead.
Can I freeze extra waffles?
Yes, after they are fully cooked, promptly cooled and properly packed. Reheating changes texture, and no exact freezer-life validation was performed for this recipe.
Are these dairy-free or gluten-free?
No. They contain wheat flour, cultured buttermilk, butter and eggs. Cornstarch is only a partial flour-blend ingredient.
Does the recipe need syrup or fruit?
No. Plain waffles or waffles with a small optional butter pat are complete. Fruit and syrup are optional separate serving additions rather than part of the measured batter.
Final Waffle Notes
For a familiar homemade breakfast, weigh the flour if possible, preheat the waffle iron, keep the mixing gentle, cook each batch fully and rest finished waffles on a rack rather than stacking them immediately. The recipe’s short ingredient list and predictable sequence make it a practical plain alternative to flavored or stuffed waffle recipes.
Final transparency: This original AI-assisted recipe has not been independently kitchen-tested. Any featured waffle image is an AI-generated illustration and is not proof of a real test kitchen result. No verified nutrition values, precise appliance-specific cook times or allergy certifications are claimed.
Print
Easy Crispy Homemade Buttermilk Waffles
- Prep Time: 15 minutes including approximately 5-minute batter rest
- Cook Time: 20–35 minutes depending on waffle-iron capacity (often 4–6 minutes per batch)
- Total Time: Approximately 35–50 minutes plus any extra preheat time
- Yield: Approximately 8 standard round waffles or 4 large Belgian-style waffles; actual count depends on waffle-maker size 1x
- Category: Breakfast & Brunch Upgrades
- Method: Hot electric waffle maker, two-bowl batter, brief rest and rack cooling
- Cuisine: American breakfast
Description
Easy homemade breakfast waffles with crisp golden edges and soft centers from all-purpose flour, cornstarch, cultured buttermilk, eggs and melted butter, cooked completely in a waffle maker.
Ingredients
2 cups (250 g) all-purpose wheat flour
1/4 cup (32 g) cornstarch, not cornmeal
2 tablespoons (25 g) granulated sugar
1 tablespoon (12 g) baking powder
1/2 teaspoon (about 2 g) baking soda
3/4 teaspoon (about 4 g) fine salt
2 large eggs
1 3/4 cups (420 ml) cultured buttermilk
6 tablespoons (85 g) unsalted butter, melted and cooled slightly
2 teaspoons vanilla extract
A little neutral oil or butter for greasing waffle plates ONLY if appliance manufacturer recommends
Optional small pat of unsalted butter to serve, about 1 teaspoon per plate; no syrup or fruit in core recipe
Instructions
Preheat waffle maker following manufacturer directions and recommended greasing and fill limits. Set a clean wire rack beside the appliance; ensure the cooking surfaces are safe and free of old residue.
Whisk dry ingredients together in a large bowl: 2 cups (250 g) flour, 1/4 cup (32 g) cornstarch, 2 tbsp (25 g) sugar, 1 tbsp (12 g) baking powder, 1/2 tsp baking soda, 3/4 tsp fine salt.
In a separate bowl whisk 2 large eggs, 1 3/4 cups (420 ml) buttermilk, 6 tbsp (85 g) melted slightly cooled butter, and 2 tsp vanilla until combined. Butter must not be hot enough to cook eggs.
Pour wet mixture into dry and gently fold just until no large dry patches remain, leaving a few small lumps. Do not beat vigorously or taste raw flour and egg batter.
Allow batter to rest about 5 minutes while the maker reaches full heat. Portion batter according to your particular machine’s capacity and recommended fill line; do not overfill.
Close iron and cook according to manufacturer, often about 4–6 minutes per batch, until waffle exterior is golden and center cooked through without wet raw batter. Avoid opening repeatedly too soon or touching hot steam/plates.
Move each fully cooked waffle to clean wire rack in a single layer to let excess steam escape. For short warm holding, a clean oven-safe rack in roughly 200°F oven can work with appropriate equipment and monitoring; never put uncooked batter directly into a holding oven.
Serve promptly plain or with optional little butter pat, divided into about 4 portions. Promptly cool and refrigerate leftovers in shallow covered containers within 2 hours (1 hour above 90°F), keep <=40°F, and reheat thoroughly to 165°F before eating.
Notes
Original AI-assisted recipe has NOT been independently kitchen-tested; featured original AI image illustrates intended waffle appearance only. No precise machine universal yield or cook time guarantee; follow waffle maker manufacturer safety, heating, grease and fill guidance. Contains WHEAT/GLUTEN (flour), MILK (buttermilk/butter), EGG; cornstarch does NOT make gluten-free. Raw flour/eggs can carry illness-causing germs; CDC/FDA advise never tasting raw waffle batter and cleaning tools/surfaces. Use 2 cups flour =250g, cornstarch 32g, buttermilk 420ml and butter 85g, no egg separating or long proofing. The 5-minute rest happens during iron preheat, not extra cooking time. Do not stack steaming waffles or seal immediately if crispness desired. USDA leftover storage at 40°F or below within 2h (1h above 90°F), 3–4 days general guidance, 165°F reheating. No invented numeric nutritional analysis or unverified kitchen test.
Nutrition
- Serving Size: About 2 standard waffles or 1 large Belgian waffle per portion; 4 portions
Keywords: simple waffle recipe, easy homemade buttermilk waffles, crispy homemade waffles, classic breakfast waffle batter, fluffy waffle recipe