
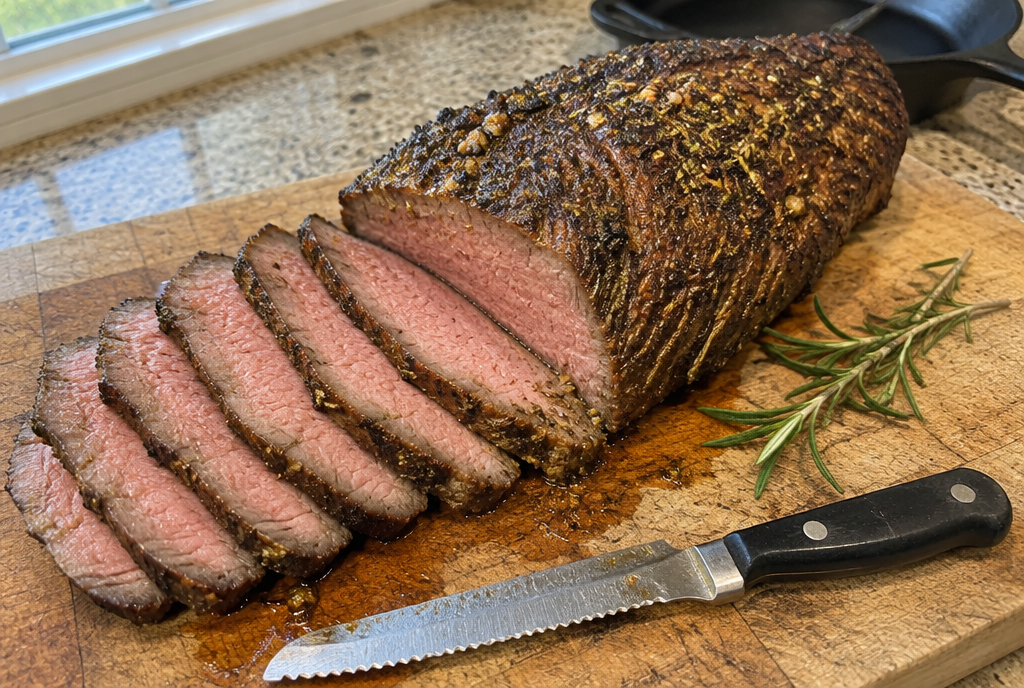
Garlic Herb Oven-Roasted Tri-Tip Steak
This tri-tip steak recipe starts with one whole triangular beef roast and turns it into a garlic-herb dinner using a skillet and a hot oven. A simple mixture of rosemary, thyme, garlic, black pepper, salt and a little smoked paprika adds flavor without bottled marinades or sweet glazes. Sear the outside for a browned crust, finish the roast in the oven, let it rest properly and carve thin slices across the changing grain for serving.
Quick answer: season a 2–2½-pound whole tri-tip roast, sear in an oven-safe skillet for about three minutes per side, then roast at 400°F (205°C) until a food thermometer reaches at least 145°F (63°C) in the thickest center. Remove from heat, rest at least three minutes for food safety—ten minutes is a useful carving rest—and cut perpendicular to the meat fibers. Oven time depends heavily on the exact roast shape and starting temperature; begin checking early instead of assuming a fixed number of minutes is safe.
This recipe is an original AI-assisted editorial formulation, not independently kitchen-tested. The cooking-time range is a practical guide. A thermometer, clean raw-meat handling and the required rest are more important than how brown or pink a slice appears.
Ingredients for six servings
- 1 whole beef tri-tip roast, about 2–2½ pounds (900 g–1.13 kg), not ground or mechanically tenderized
- 2 tablespoons (30 ml) neutral high-heat cooking oil, divided between coating and searing
- 4 medium garlic cloves, finely minced
- 1 tablespoon chopped fresh rosemary leaves
- 1 teaspoon finely chopped fresh thyme leaves
- 1½ teaspoons kosher salt, adjusted for the actual roast weight and salt brand
- 1 teaspoon coarsely ground black pepper
- ½ teaspoon smoked paprika
The recipe uses a single intact roast. A package labeled tri-tip steaks, containing thin individual steaks, needs a different cooking schedule from a whole roast; the oven portion below is designed for one thick piece of beef. Ask the butcher whether a roast has been mechanically tenderized and follow any validated package cooking directions if applicable.
No barbecue sauce, butter, wine, mustard or Worcestershire sauce is required. That keeps the original herb crust straightforward and avoids adding unexpected allergens from a premixed sauce. Always check packaged seasonings and the meat label for individual dietary needs.
Equipment for a reliable roast
Use a large oven-safe cast-iron or heavy stainless-steel skillet, an oven preheated to 400°F, a clean carving board, sturdy tongs, paper towels and a reliable instant-read or leave-in food thermometer. If your skillet handle is not rated for 400°F, sear in the skillet and transfer to a preheated rimmed roasting pan. Do not place a skillet with a plastic handle in the oven.
A sharp carving knife matters as much as the cooking pan. Tri-tip muscle fibers travel in different directions in different parts of the roast. Slicing across those fibers after resting gives a more tender bite than running the knife parallel to long strands.
Keep raw-meat utensils separate from clean plates. Wash your hands after touching uncooked beef and sanitize the board used during seasoning before using it for the cooked roast. A clean thermometer probe should enter the thickest part of the meat, not touch the hot skillet or fat layer.
How to cook garlic herb tri-tip in the oven
1. Preheat and prepare a safe workspace
Set the oven to 400°F (205°C), positioning the rack near the middle. Clear the counter and prepare separate plates for raw and cooked meat. Take the tri-tip from the refrigerator just before seasoning rather than leaving it sitting out for hours. Confirm your skillet is oven safe or have a rimmed oven-safe roasting pan ready.
2. Trim and pat the roast dry
Check the roast for a tough silvery membrane. Trim away visible silverskin with a sharp knife without cutting off large amounts of useful meat. A modest fat layer can remain, depending on the roast and your preferences. Pat the surface dry with paper towels and discard them immediately. Note the direction of the fibers on each side of the triangular cut so you will know how to carve after cooking.
3. Mix and apply garlic-herb seasoning
In a clean small bowl combine the minced garlic, chopped rosemary, thyme, kosher salt, black pepper and smoked paprika. Rub the roast with one tablespoon of oil, then distribute the seasoning mixture over every side, pressing it lightly into the meat. Keep the raw-meat side of the work area separate from finished-dish tools.
4. Brown the outside in a hot skillet
Place an oven-safe skillet over medium-high heat and add the remaining tablespoon of oil. When it shimmers, carefully add the tri-tip with tongs. Sear for about three minutes on the first broad side and two to three minutes on the other, until well browned. Avoid letting the garlic turn black. The skillet sear builds flavor; it does not prove the roast is fully cooked inside.
5. Roast until the thermometer confirms safe doneness
Transfer the skillet to the preheated oven, or move the seared beef to an oven-safe roasting pan. Roast uncovered, beginning temperature checks around 18–20 minutes after the oven step; many roasts of this size may need about 20–40 minutes, but times are estimates only. Insert a thermometer into the thickest center of the whole-muscle beef without touching pan or bone. Continue heating until the center reaches at least 145°F (63°C) before removing it from the heat. If the roast is mechanically tenderized, follow the product’s validated safety instructions instead of relying solely on this general whole-muscle method.
6. Rest the cooked beef for at least three minutes
Use oven mitts to move the hot skillet safely and transfer the roast to a clean board. Allow it to rest for at least three full minutes after reaching 145°F; approximately ten minutes can help settle juices before carving. A loose foil tent is optional, but do not wrap so tightly that the exterior steams. Avoid cutting immediately after removal.
7. Identify the grain and slice across it
After resting, look at the direction of the muscle fibers. Tri-tip often has a point where the grain changes direction. Separate the roast into two sections near that transition if it makes carving easier, then turn each section so your knife passes perpendicular to the fibers. Cut thin slices, around ¼ inch thick, rather than long slices with the grain.
8. Serve and store leftovers promptly
Arrange the slices on a clean platter, spooning over any clean resting juices if desired. Serve while warm. Divide leftovers into shallow covered containers and refrigerate within two hours at 40°F (4°C) or below; use within a conservative three-to-four-day period or freeze promptly. Reheat leftovers thoroughly to 165°F (74°C).
What is tri-tip steak, and why is it triangular?
Tri-tip is a triangular beef cut from the bottom sirloin. It is often sold as a single roast of roughly two to three pounds, though smaller trimmed pieces are also available. It has a noticeably tapered shape, which is one reason the narrow end can finish sooner than the thick center.
The name can be confusing on store labels. Some packages say tri-tip roast, others tri-tip steak, and sometimes the meat has already been cut into individual portions. This recipe is for a whole intact roast. Thin steaks should not be roasted in the oven for the same long interval as a thick whole piece.
In parts of California, tri-tip is closely associated with outdoor grilling and Santa Maria-style barbecue. This version is not presented as an exact recreation of a specific regional barbecue tradition: it is an accessible indoor oven-and-skillet adaptation with garlic and herbs. No outdoor smoker, wood fuel or specialty rub is required.
Why sear first and roast second?
Searing creates a browned surface that carries savory roasted aromas. Moving the meat into the oven afterward allows heat to progress toward the thick center without continuing to scorch the outside on a high burner.
But searing is not a food-safety shortcut. A deeply brown crust can surround an undercooked center. The roast needs a thermometer check as the oven cooking progresses, and the center must reach the safe whole-muscle beef temperature before removal.
A cast-iron skillet handles the shift from stovetop to oven conveniently. If yours has a plastic grip or is too small for the triangular piece, use two safe pans rather than balancing the roast precariously across the edges.
The safe temperature for a whole tri-tip roast
For whole-muscle beef steaks and roasts, the USDA Food Safety and Inspection Service recommends at least 145°F (63°C) and a minimum three-minute rest before carving or eating. This recipe follows that conservative consumer food-safety standard instead of assuming lower steakhouse serving temperatures are an appropriate general safety recommendation.
Use the thermometer in the deepest section. On a triangular roast, different ends will heat at different speeds; measuring the tip alone is not enough. If the tip reaches 145°F but the thicker section is below it, continue roasting and check the thick center again.
Ground beef follows a different minimum of 160°F (71°C) and this intact-roast procedure must not be reused for ground beef patties. If the product has been injected, blade-tenderized or otherwise mechanically tenderized, follow the validated package directions because its handling can differ from intact beef.
Why the three-minute rest really matters
The rest is part of the USDA recommendation, not simply a trick for juicier carving. Start counting after the thermometer has confirmed 145°F and the roast is removed from the heat. Do not treat the time on the cutting board as permission to take it out of the oven at a lower temperature and hope it rises.
You may choose to rest the roast for about ten minutes for easier slicing, which exceeds the three-minute minimum. A loose tent can keep the surface from cooling too quickly, but avoid wrapping it tightly or leaving it in a heated oven where it continues cooking substantially.
A well-rested roast is also easier to slice neatly. The juices can settle somewhat, and you have time to locate the change in grain before putting the carving knife to the meat.
Cutting against the grain: the biggest texture difference
Tri-tip often has two directions of visible muscle fibers. On one side they may run diagonally from the broad end, while on another section they turn toward the pointed end. If you carve one straight line across the entire roast without observing those fibers, some slices may turn out chewy.
Before cooking, inspect the raw roast and note the grain direction or take a quick reference photo for yourself. Once browned, the surface can make fibers harder to recognize. After resting, cut the roast into two pieces if needed where the direction changes, rotate each piece and make thin cuts perpendicular to the fibers.
Do not confuse across the grain with cutting across the roast’s geometric length. The goal is to shorten the visible muscle fibers in every bite. Thin slices help even a less tender portion feel pleasant without hiding it under a thick sauce.
How to choose a tri-tip at the butcher counter
Ask for a whole tri-tip roast weighing approximately 2–2½ pounds with reasonably even thickness through the center and a manageable fat layer. A tapered point is normal. If a cut is smaller or larger than the suggested weight, cooking time can change, but the safe temperature rule remains.
Fresh beef should be properly chilled and in packaging that is intact. Check use-by information and ask if it has been mechanically tenderized or marinated. A pre-marinated roast can contain substantial salt, sugar or allergens, and is not equivalent to the unseasoned meat specified here.
A large silverskin membrane is tough even after roasting; trim obvious patches carefully. Do not trim away every bit of surface fat, because a moderate layer can help flavor the roast, but remove excessive hard exterior pieces if needed.
Building a balanced garlic-herb crust
Rosemary is strongly aromatic, so the measured tablespoon is enough for an average roast. Thyme contributes a milder herbal note, and smoked paprika adds color without requiring a smoker. Minced garlic distributes over the surface and should stay golden-brown rather than black.
Salt and pepper are measured, but salt granule size matters. A teaspoon of one kosher salt brand can contain a different mass than a teaspoon of another. If you cook with very fine table salt, do not substitute the exact volume blindly; weigh or reduce and adjust for your meat size.
A tablespoon of oil helps the herbs stick; the other tablespoon goes into the skillet. There is no need to pour butter over the roast or use an excessive amount of oil. Keeping the coating thin allows the meat surface to brown.
Why a thermometer matters more than the clock
A 2½-pound triangular roast may be long and relatively thin, or compact with a very thick center. The two shapes don’t cook identically, even though the scale reads the same weight. Oven calibration, skillet temperature and how cold the meat was when it entered the oven also affect time.
The 20–40-minute oven estimate is therefore a planning range, not a safety guarantee. Start checking early and keep roasting as necessary until 145°F registers in the thickest edible center. If a thermometer probe touches hot metal or the surface fat instead of the center, it can produce a misleading number.
A leave-in probe can be useful for monitoring a larger roast, but verify its placement. For a narrow end, the tip of the probe may sit too close to the surface. Check a second position with a clean instant-read thermometer before declaring the meat done.
Oven temperature: why use 400°F?
A moderately hot 400°F oven supports browning and finishes the roast at a manageable pace after the initial sear. Other tri-tip methods use much higher or lower temperatures, including grill smoke and reverse searing, but they need their own time guidance.
This version is designed for a standard home oven. Keep the roast uncovered and avoid placing it directly against an oven heating element. Use an oven-safe skillet or tray that provides room around the meat and catches the cooking juices.
If the outside darkens quickly while the center remains below 145°F, reduce the oven temperature modestly and continue checking the center. Don’t try to hide an excessively burned herb crust under sauce. For future attempts, sear a little less aggressively and avoid leaving large pieces of garlic on the surface.
Serving tri-tip for a family dinner
Thinly sliced tri-tip can serve six as part of a meal with simple side dishes. Roasted vegetables, steamed green beans, baked potatoes or a salad are possible companions, but they are not ingredients in the roast recipe. Their cooking methods and any temperature checks are separate.
For a more indulgent steak-style idea, explore our Cajun mozzarella ribeye slab. For a sweet-leaning beef recipe, the loaded honey ribeye stack offers a distinctly different sauce profile. Our baked mostaccioli with beef and mozzarella is a family-style pasta casserole rather than a sliced whole-beef roast.
These links provide meaningful choices within the beef and comfort-food sections of MySavorista. They aren’t instructions to add honey, mozzarella or pasta to this garlic-herb roast.
Common tri-tip problems and practical fixes
The outer edge is dry before the center is ready. Your roast may be highly tapered or the sear too aggressive. Lower oven heat if necessary, monitor the thick center and avoid overcooking after the safe temperature is confirmed.
The beef is chewy despite safe cooking. You may have sliced with the grain. Locate both directions of muscle fibers and cut across each section in thin slices after resting.
Garlic tastes burned. Minced pieces scorched during the skillet sear. Use a moderate initial heat and keep the garlic pieces distributed rather than piled in one place.
Seasoning tastes overly salty. Salt crystal sizes vary and the roast may be smaller than expected. Measure carefully, choose an unseasoned cut and avoid adding premixed salty rubs.
The center temperature seems inconsistent. The probe may have touched hot metal, a fat pocket or a narrow end. Reinsert into the thickest edible center from another direction and verify.
Meat has no crust. The surface may have been wet or the skillet overcrowded. Pat dry, give the roast solid contact with the hot pan and avoid moving it constantly.
The roast looks pink after reaching 145°F. Color alone isn’t a safety test. The trusted thermometer reading and at least three-minute rest determine adherence to the USDA guidance.
All juices run out when slicing. The roast may have been cut immediately. Always honor the rest period; a ten-minute rest can make carving easier.
Make-ahead seasoning and refrigerator handling
You can mince garlic, measure herbs and prepare the seasoning mix several hours before cooking. Keep perishable ingredients refrigerated as appropriate. If you rub the raw beef ahead, cover it and refrigerate rather than leaving it on the kitchen counter.
A refrigerated pre-seasoned roast may need a somewhat different oven interval because it starts cold. That is another reason the thermometer is essential. Don’t let raw meat sit out for hours in an attempt to standardize its temperature.
If you’re serving guests, prepare side dishes and set the clean carving board before starting the roast. You will then be able to handle the hot skillet safely, honor the required rest and serve the beef while it is still warm.
Storage and reheating safely
The FDA’s food-safety guidance recommends refrigerating perishable cooked food promptly, at 40°F (4°C) or below, and within two hours of preparation—or within one hour when the surrounding temperature exceeds 90°F (32°C).
Divide leftover beef into shallow clean containers and use refrigerated leftovers within three to four days, or freeze promptly. When reheating, warm leftovers to 165°F (74°C), using a covered pan with a splash of water or broth if needed to keep slices from drying. Reheat only what you plan to serve rather than repeatedly warming the entire container.
This is a fresh-cooked roast, not a shelf-stable meat preserve. Do not leave sliced beef on the kitchen counter overnight or assume a brown crust protects it from unsafe storage conditions. When handling or refrigeration has been uncertain, discard it.
Frequently asked questions
What cut of beef is tri-tip?
Tri-tip is a triangular cut from the bottom sirloin. It is often sold as a whole roast, which is what this recipe uses.
Can I cook a whole tri-tip in the oven?
Yes. Sear it in an oven-safe skillet and finish in a 400°F oven, using a thermometer rather than cooking strictly by minutes.
What internal temperature is safe for tri-tip?
For an intact whole-muscle beef roast, use 145°F (63°C) in the thickest center and let the beef rest for at least three minutes per USDA guidance.
Is 130°F safe for this recipe?
This general-purpose recipe follows USDA consumer guidance of 145°F with a minimum three-minute rest; it does not endorse removing the roast at 130°F and assuming carryover heat will meet that guidance.
How long does a two-and-a-half-pound tri-tip take?
Start checking after about 18–20 minutes in the oven following the sear. Some roasts need around 20–40 minutes or longer, depending on thickness and oven behavior. Temperature is the deciding factor.
Should I cover the meat while roasting?
The baseline method roasts the beef uncovered after searing. You may loosely tent while resting, but avoid sealing it so tightly that the crust steams.
Why does tri-tip have two grain directions?
The muscle fibers change orientation across this triangular cut. Observe the direction in each section and carve perpendicular to the fibers for more tender slices.
How thin should I slice tri-tip?
Approximately ¼-inch slices, cut across the grain after resting, are a useful starting point for a family-style platter.
Is a grill required for tri-tip steak?
No. Grilling and smoking are popular for the cut, but this recipe is specifically an oven-and-skillet adaptation with garlic and herbs.
Can I make tri-tip ahead of dinner?
You can prepare the seasoning and refrigerate raw meat safely ahead of time. Roast close to service for the best texture and honor the safe internal temperature and rest.
How do I reheat leftover tri-tip?
Store promptly in the refrigerator, then reheat individual portions thoroughly to 165°F (74°C) with a little moisture to reduce drying.
Editorial transparency and reference sources
This is original AI-assisted editorial recipe content, not independently kitchen-tested. The seasoning ratios, cooking-time estimates and expected texture are not observations from a physical MySavorista test roast. The featured image is an AI-generated illustration of the intended oven-roasted beef, not a photograph of food prepared in the editorial kitchen. No validated nutrition analysis is claimed.
The recommended 145°F whole-muscle beef minimum with a three-minute rest follows the USDA Food Safety and Inspection Service. Refrigeration, hygiene and leftovers information follows the FDA’s safe food handling guidance. These references support safety principles and do not certify this particular recipe as kitchen-tested.
Editorial transparency: This original AI-assisted tri-tip roast recipe has not been independently kitchen-tested. The featured image is an AI-generated illustration, not a photograph of an actual test roast. Follow USDA whole-muscle beef guidance: 145°F at the thickest center before removing from heat and at least a three-minute rest before carving.
Print
Garlic Herb Oven-Roasted Tri-Tip Steak
- Prep Time: 15 minutes
- Cook Time: 45 minutes, approximate
- Total Time: 70 minutes, including 10-minute carving rest
- Yield: 6 servings 1x
- Category: BBQ, Grilling & Smokehouse
- Method: Skillet sear then oven roast at 400°F
- Cuisine: American home cooking, California-inspired
Description
Whole garlic-herb beef tri-tip roast seared in a heavy skillet and finished at 400°F in the oven; USDA whole-muscle beef cooking target at least 145°F with a minimum three-minute rest.
Ingredients
1 whole intact beef tri-tip roast, about 2–2 1/2 pounds (900 g–1.13 kg), NOT ground or mechanically tenderized
2 tablespoons (30 ml) neutral high-heat cooking oil, divided
4 medium garlic cloves, finely minced
1 tablespoon freshly chopped rosemary leaves
1 teaspoon fresh thyme leaves, finely chopped
1 1/2 teaspoons kosher salt, adjusted to roast size and salt grain
1 teaspoon coarsely ground black pepper
1/2 teaspoon smoked paprika
Instructions
Preheat oven to 400°F (205°C), position rack at center and set out an oven-safe skillet or rimmed roasting pan. Keep raw-meat equipment away from clean serving plates.
Inspect the intact tri-tip roast for tough silver membrane and carefully trim it away; pat meat dry and note the two grain directions for slicing later. Refrigerate until ready to season.
Mix garlic, rosemary, thyme, kosher salt, black pepper and smoked paprika. Rub the roast all over with 1 tablespoon of oil and press seasonings evenly onto the exterior.
Heat an oven-safe skillet over medium-high with the remaining tablespoon of oil. Sear the roast approximately 3 minutes on the first broad side and 2–3 minutes on the second, without burning garlic. This browns the exterior but DOES NOT cook the center safely.
Move the roast in its oven-safe skillet or separate roasting pan to the 400°F oven. Begin checking after 18–20 minutes, expecting roughly 20–40 minutes or more as needed. Cook until a food thermometer reads AT LEAST 145°F (63°C) in the THICKEST CENTER BEFORE removing from heat. Follow validated package directions if mechanically tenderized beef is used instead.
Transfer cooked beef to a CLEAN board and let rest AT LEAST THREE FULL MINUTES after the 145°F thermometer reading; about 10 minutes is convenient for carving. Do NOT remove early at 130°F relying on carryover to meet the guideline.
Identify where the two muscle grain directions change; separate into sections if necessary. Rotate pieces and cut thin slices around 1/4 inch thick ACROSS the fibers rather than with the grain.
Serve on a clean platter with clean resting juices if desired. Put leftovers in shallow covered containers and refrigerate within 2 hours at 40°F (4°C) or below; eat within 3–4 days or freeze and reheat leftovers thoroughly to 165°F (74°C).
Notes
Original AI-assisted recipe not independently kitchen-tested. Apply USDA FSIS whole-muscle beef safe minimum 145°F (63°C) BEFORE removing from heat, and mandatory rest at least 3 minutes; a 10-minute rest may help carving. Ground beef requires 160°F, different from this intact roast. Check mechanically tenderized labeling and follow product’s validated package cook instructions. Raw beef must be kept separate from clean utensils and plates. USDA/FDA leftovers guidance: refrigerate within 2 hours (1 hour if ambient >90°F) at <=40°F, use within 3–4 days or freeze, reheat to 165°F. AI hero image illustrative, not photo of real kitchen trial.
Nutrition
- Serving Size: About one-sixth of the 2–2 1/2 pound raw tri-tip roast before cooking and trimming
Keywords: tri tip steak recipes, oven roasted tri tip, garlic herb tri tip roast, tri tip steak oven
1 thought on “Garlic Herb Oven-Roasted Tri-Tip Steak”