
One-Bowl Chocolate Cake with Easy Cocoa Glaze
A one-bowl chocolate cake recipe should save dishes without sacrificing a tender, chocolate-rich crumb. This version is made in an 8-inch square pan using ordinary all-purpose flour, natural unsweetened cocoa, buttermilk, oil, one egg and vanilla. The method uses one large mixing bowl, a whisk, and a pan; there is no stand mixer and no boxed cake mix. When the cake cools, a thin chocolate-chip glaze adds a simple finish without the time required to make a buttercream.
The batter begins with the dry ingredients, takes the egg, buttermilk and oil directly into the same bowl, and finishes with a measured amount of hot water. The water loosens the batter and helps the cocoa blend evenly. The baked result should be soft and sliceable, not runny, pudding-like or as dense as brownies. Letting it cool before glazing makes a noticeable difference in how neatly the nine squares cut.
Quick method: Whisk the dry ingredients together, add egg, buttermilk, oil and vanilla, then gently whisk in hot water. Pour into a greased and parchment-lined 8-inch square pan; bake at 350°F (175°C) for about 30–35 minutes, or until the center is set and a toothpick shows only a few moist crumbs. Cool completely, spread over a thin glaze made from semisweet chocolate chips and warm heavy cream, and cut into nine squares.
This is an original AI-assisted editorial recipe formulation, not independently kitchen-tested. Baking times are estimates; use the observable cues to judge your own pan and oven.
Why make chocolate cake in one bowl?
A classic layer cake often involves creaming butter, whipping eggs, or dividing dry and wet ingredients into different containers. Those techniques can be useful, but they are not essential to every cake. This recipe relies on oil for moisture, buttermilk for a light tang and cocoa for concentrated chocolate flavor. It is designed to be combined by hand in one bowl.
The main advantage is a straightforward workflow. While the oven heats, measure everything, prepare the pan and whisk the mixture. There is no elaborate frosting to make and no need to wait for butter to soften. That makes the cake a practical weeknight dessert, a bake-sale-style treat or a small birthday cake when a full layered celebration cake would be excessive.
This recipe is not a brownie. Brownies often use a different proportion of flour to fat, and may aim for a dense, fudgy center. Here the objective is a baked, delicate cake crumb that springs back lightly rather than a rich unset middle. If you enjoy a separate chewy dessert, our Maple Pecan Cheesecake Swirl Brownies offer a very different texture.
Ingredients for one 8-inch square cake
This produces approximately nine modest dessert squares.
For the chocolate cake
- 1½ cups (180 g) all-purpose flour, spooned into the cup and leveled or weighed.
- 1 cup (200 g) granulated sugar.
- ⅓ cup (about 28 g) natural unsweetened cocoa powder, not sweetened hot-cocoa mix.
- 1 teaspoon baking soda.
- ½ teaspoon baking powder.
- ½ teaspoon fine salt.
- 1 large egg, preferably not straight from a very cold refrigerator.
- ¾ cup (180 ml) cultured buttermilk, shaken before measuring.
- ⅓ cup (80 ml) neutral vegetable oil, such as canola or sunflower.
- 1 teaspoon vanilla extract.
- ½ cup (120 ml) hot water, hot enough to disperse cocoa but not boiling violently.
For the simple chocolate glaze
- ¾ cup (about 130 g) semisweet chocolate chips.
- ¼ cup (60 ml) heavy cream, warmed just enough to melt the chips.
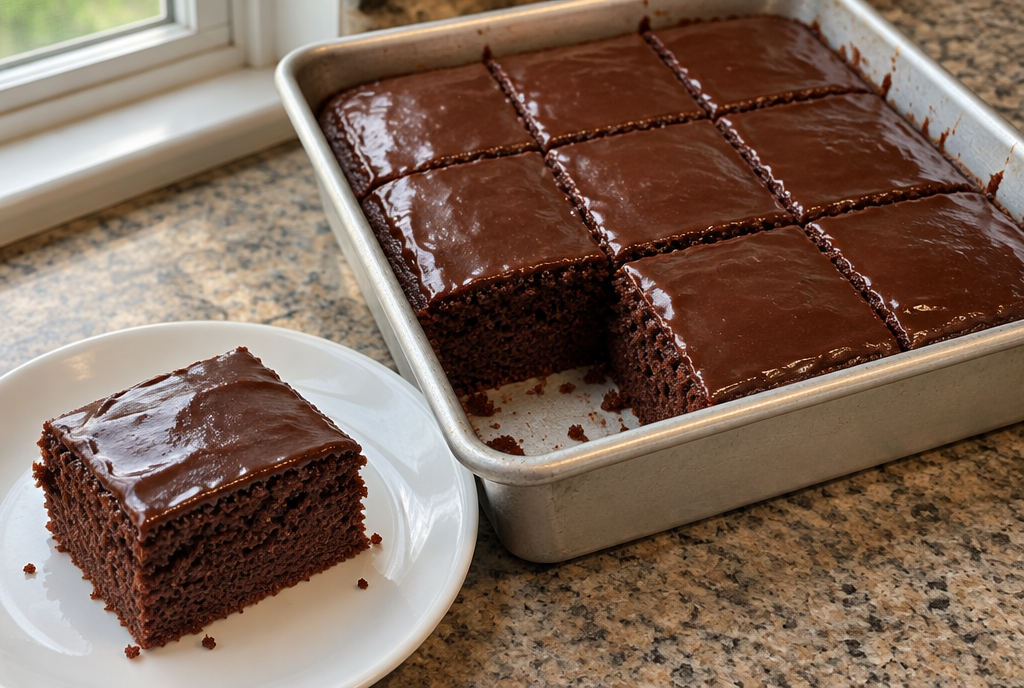
The thin glaze is part of the pictured finished cake. If you prefer an unfrosted cake, you can skip the two glaze ingredients and serve the cake plain after cooling. That changes only the topping, not the measured cake batter. For a dairy-free variation you would need to check both buttermilk and glaze replacements separately; do not simply omit the buttermilk and expect the same rise.
Choosing the correct cocoa powder
Natural unsweetened cocoa is the intended choice here. It has a different acidity profile from many Dutch-process cocoa powders, which matters when baking soda is one of the leaveners. Do not assume that every cocoa product performs identically in the same recipe. Avoid sweetened drink powders, which contribute additional sugar and usually contain other ingredients.
Sift or break up visible cocoa lumps before adding wet ingredients. It is easier to remove lumps while everything is dry than after the batter has been mixed. For a slightly deeper chocolate flavor, use a good-quality cocoa that tastes pleasant and does not smell stale.
Why buttermilk and oil?
Buttermilk contributes liquid and acidity, and oil keeps the cake tender even after it has cooled. The formula is designed around ¾ cup buttermilk; swapping it for plain water removes both flavor and part of the chemical balance. If you need a replacement, choose a tested buttermilk substitute for cakes, and expect possible differences in texture.
The oil is neutral rather than strongly flavored. Extra-virgin olive oil can produce a distinctive cake, but that is an intentional variation and may not suit everyone. Use a flavor-neutral oil for the baseline version before experimenting.
Equipment and realistic timing
You need one large mixing bowl, a whisk, a measuring cup or scale, a heatproof cup for the water, a spatula, an 8-inch square metal baking pan, parchment paper, and a wire cooling rack. For the glaze, a small microwave-safe or heatproof bowl and spoon are enough.
Expect approximately 15 minutes of hands-on prep, 30–35 minutes baking, and at least 60 minutes of cooling before glazing. The glaze itself takes about 5 minutes to assemble and a short time to settle. For planning purposes, allow roughly 1 hour 55 minutes from starting to a glazed cake ready to slice, but do not treat this as a promise that your specific kitchen will cool at an identical rate.
A dark metal pan can bake differently from a light metal pan. Glass pans also transfer and retain heat differently. The recipe timing assumes an ordinary light-colored 8-inch square metal cake pan; follow actual doneness cues and adjust if your pan is different.
How to make one-bowl chocolate cake step by step
1. Preheat the oven and prepare the pan
Position the oven rack near the center and preheat to 350°F (175°C). Lightly grease an 8-inch square pan, then line the bottom with parchment, leaving a small overhang if you want to lift the cake out after cooling. Smooth the paper so it lies flat.
Prepare the pan before mixing batter. Once the leavening meets the liquid ingredients, the chemical reaction begins, so it is better not to leave the mixed batter sitting while you search for parchment or wait for the oven to heat.
2. Whisk all the dry ingredients in one bowl
Add 1½ cups flour, 1 cup sugar, ⅓ cup cocoa, 1 teaspoon baking soda, ½ teaspoon baking powder and ½ teaspoon salt to a large bowl. Whisk thoroughly for about 30 seconds, scraping around the edges to break up any clumps.
Take an extra moment to check that the leaveners are evenly dispersed. A small pocket of baking soda can leave a bitter taste or cause an uneven rise. The mixture should be uniformly cocoa-brown, with no pale flour streaks.
3. Add the egg, buttermilk, oil and vanilla
Make a shallow well in the center of the dry ingredients. Add the egg, ¾ cup buttermilk, ⅓ cup oil and 1 teaspoon vanilla. Use the same whisk to stir slowly until the dry mixture has almost disappeared.
Scrape the bottom and sides with a spatula. Stop as soon as the batter is reasonably smooth; it does not need several minutes of vigorous beating. Overworking flour-based cake batter can create a tougher result. At this point the batter may look a little thick, which is expected before the water is added.
4. Stir in hot water gradually
Measure ½ cup hot water in a heatproof cup. Add it in two or three additions while whisking gently. The batter will become thinner and more pourable, but it should still look uniformly chocolate-colored.
Use caution when handling the hot cup. You do not need a rolling boil or a vigorous splash of boiling liquid into the egg mixture. The objective is to incorporate the cocoa and create a workable batter, not to cook the egg in the bowl. Scrape the sides once more to catch hidden flour.
5. Transfer to the prepared pan
Pour the batter into the prepared 8-inch pan. The batter will be looser than cookie dough and many brownie batters. Use the spatula to spread it into the corners, then tap the pan once or twice gently on the counter to release large trapped bubbles.
Do not fill the pan all the way to the rim. If you accidentally used a smaller pan, stop and transfer to a correctly sized pan rather than risk overflow. An 8-inch square gives the intended depth for the bake-time guidance.
6. Bake and use doneness cues
Bake on the center rack for approximately 30–35 minutes. Begin checking around the 28-minute mark if your oven runs hot. The center should be set, with no liquid wobble, and a wooden toothpick inserted near the center should come out with a few moist crumbs rather than wet, shiny batter.
The top may show small cracks or a slight dome. That is normal for a simple home cake. If the edges are clearly set but the center is still wet, continue in small increments and check again. Avoid opening the oven every two minutes during the early part of baking.
7. Cool the cake completely
Remove the pan to a heatproof surface or wire rack. Leave the cake in its pan for at least 15 minutes, then let it cool fully before adding the glaze. If using parchment overhang, carefully lift the cake only after it has enough structure to hold together.
Glazing a warm cake makes the chocolate run into a thin, sometimes patchy coating. A fully cooled surface lets you spread a smooth layer and cut clean squares. The cooling time is not optional if you want the appearance shown in the recipe image.
8. Make the two-ingredient glaze
Place ¾ cup semisweet chocolate chips in a heatproof bowl. Warm ¼ cup heavy cream until steaming but not boiling vigorously; pour it over the chips. Let stand about 2 minutes, then stir gently until smooth.
If a few chips remain, warm the mixture briefly and stir again rather than overheating it. The glaze should be smooth and spreadable, not scorched or stiff. If it looks too fluid, let it cool slightly before spreading; it will thicken as the chocolate cools.
9. Glaze, rest and slice
Spread the chocolate glaze in a thin, even layer across the cooled cake using the back of a spoon or a small offset spatula. Give it a few minutes to settle, then cut into nine squares with a clean knife.
For especially tidy cuts, wipe the knife after each slice. Serve at cool room temperature for the best soft texture, but follow the storage guidance below for the cream-containing glaze. The cake should have a moist but completely baked interior, not a wet center.
What the cake should look like when it is done
A properly baked one-bowl chocolate cake has a uniform dark cocoa color and a crumb that holds together when you lift a square. It should be soft enough to compress slightly with a fork, but not gummy or raw. A few damp crumbs on the toothpick are acceptable; liquid batter is not.
The top of the unglazed cake will look relatively matte, with possible small cracks. The glaze adds sheen afterward. Do not bake until the cake becomes rigid and completely dry just because you expect a spotless toothpick—that can produce an unnecessarily dry dessert.
Professional baking resources such as King Arthur Baking’s chocolate cake guide also describe checking oven-baked chocolate cakes for a set structure. Our formula, quantities and single-pan method are separate from that reference; it is included as general baking context rather than a claimed test of this exact recipe.
How to keep a one-bowl chocolate cake moist
The first factor is measuring flour accurately. Too much flour absorbs the available liquid and can create a coarse or dry crumb. Weigh 180 g if you have a kitchen scale, or spoon flour lightly into the measuring cup and level it without packing.
The second factor is not overbaking. Set a timer before the earliest suggested finish and use the center-toothpick test as a guide. If the cake looks done at 31 minutes, it is not necessary to leave it until 35 just because a range appears in the recipe.
Finally, store the baked cake covered. Air exposure dries cut surfaces quickly. For the cream-glazed cake, refrigerate leftovers in an airtight container rather than leaving them on the kitchen counter overnight.
Troubleshooting common chocolate cake problems
Why did my cake sink in the middle?
A sunken center can mean the batter was underbaked, the oven temperature was too low, or the oven door was opened repeatedly before the cake structure had set. Using too much leavener can also contribute. Check measurements, preheat fully and judge doneness at the center rather than the edges.
Why is the cake dry or crumbly?
Overbaking or too much flour are common reasons. Measure flour carefully, use the specified pan size and check early. Cutting into a still-warm cake can also make the crumb appear ragged, even if it is not technically dry.
Why are there large holes in the cake?
Unevenly mixed baking soda or baking powder can create irregular air pockets. Whisk the dry ingredients thoroughly first and scrape the bowl after adding the wet ingredients. Avoid prolonged beating once the flour is hydrated.
Why is the glaze grainy?
Chocolate may seize if overheated or exposed to the wrong moisture balance. Use gentle heat, pour the warm cream over the chips, pause and stir slowly. If the glaze is still lumpy, add warmth in brief increments rather than boiling it aggressively.
Why is the center gummy?
The cake may need more oven time, or the batter may have been mixed heavily. A gummy center can also result from cutting too soon while the crumb is still setting. The fix is to follow the center-doneness test and allow adequate cooling.
Can I double the recipe in the same 8-inch pan?
No. Doubling the ingredients while keeping the same small pan changes batter depth and baking conditions. Use a larger appropriately sized pan and a separately validated bake-time range, or make two separate 8-inch cakes. Do not assume the same 30–35 minutes applies to doubled batter.
Ingredient substitutions and variations
Without the chocolate glaze
Skip the chocolate chips and cream if you want a simple everyday snacking cake. The cake batter remains unchanged. You can serve it plain or dust a little confectioners’ sugar over the fully cooled surface if that is your preference.
Can I substitute regular milk for buttermilk?
Because buttermilk affects acidity and texture, directly exchanging it for plain milk is not a guaranteed equivalent. For best consistency use cultured buttermilk. A homemade milk-and-acid substitute may sometimes work in cakes, but its acidity and thickness can vary; this recipe has not been independently tested with that swap.
Can I use Dutch-process cocoa?
The specified formula uses natural cocoa and baking soda. Dutch-process cocoa has been alkalized and may not interact with baking soda in quite the same way. A substitution could change flavor, color and rise. For a predictable starting point use natural unsweetened cocoa.
Can I use coffee instead of hot water?
You can experiment with hot brewed coffee in place of the measured half cup of water; coffee can add a roasted note to chocolate desserts. It also adds caffeine and changes the flavor. The baseline formulation uses water, so the coffee variation is not presented as independently tested.
Can I make cupcakes from this batter?
The batter may be portioned into cupcake liners, but bake time will be shorter and the yield depends on fill level. Since this exact formula has not been verified as cupcakes, use a cupcake-specific recipe for an occasion where timing and appearance must be predictable.
What about a gluten-free version?
Do not assume all-purpose flour can be replaced one-for-one with every gluten-free blend. Different blends absorb water differently and may require binders. Choose a proven gluten-free chocolate cake formulation if that is a dietary requirement.
Serving ideas for chocolate dessert lovers
This little cake is rich enough to serve alone in modest squares. For a casual dessert table, you can set it beside our Chocolate Chip Bacon Cheesecake Bars for guests who want a cream-cheese dessert with a different texture. These are separate recipes, not ingredients to add to the cake.
A cool drink can balance the cocoa flavor. The Decadent Chocolate Peanut Butter Milkshake is an especially indulgent pairing, so keep portions small if serving both together.
If you want more dessert choices without making a second cake, the Maple Pecan Cheesecake Swirl Brownies offer a distinct dense bar texture. A small piece of each can make an attractive dessert sampler without changing this cake’s ingredients or method.
Storage and food safety
Because the glaze contains heavy cream, cover the cake and keep leftover glazed portions in the refrigerator, ideally at 40°F (4°C) or colder. For quality, use within roughly 3–4 days if the cake was handled and chilled correctly. Bring an individual slice to a pleasant serving temperature shortly before eating if you prefer a softer crumb.
Do not leave cream-glazed cake unrefrigerated overnight. A short period at room temperature for serving is different from long storage. For perishable food, the usual guidance is to refrigerate within two hours, or within one hour in very hot conditions above 90°F (32°C).
Freeze slices only if you are comfortable with possible changes to the glaze after thawing. Wrap each slice tightly, then freeze in a suitable container. Thaw in the refrigerator to reduce condensation and handle the creamy topping cautiously.
Do not taste raw batter. The flour and egg in this cake are intended to be cooked. The CDC’s raw flour and dough safety guidance explains that uncooked flour and raw eggs may contain harmful germs. Wash tools, hands and surfaces that contacted the raw batter before using them for serving.
How to make it ahead for a gathering
If you need this cake the following day, bake and cool it first. Prepare the glaze after the cake reaches room temperature, then cover and refrigerate the finished cake. This is more reliable than trying to glaze a warm cake right before guests arrive.
For a bake sale or potluck, transport the cake in its pan with a snug cover, ideally with cooling support if conditions are warm. Cut neat squares before service if there will be no convenient cutting space. The glaze is thin enough to portion without layers sliding around.
Keep the cake away from raw-food preparation zones. Set out a few pieces at a time and replenish from chilled storage instead of leaving the full pan on a warm buffet for hours.
Frequently asked questions
Can you make chocolate cake with just one bowl?
Yes. In this recipe, dry ingredients are whisked in one large bowl, followed by egg, buttermilk, oil and vanilla, then a measured amount of hot water. Only a small separate heatproof vessel is needed for warming the glaze.
What size pan should I use?
Use an 8-inch square metal baking pan. A different size changes cake thickness and baking time. The listed 30–35-minute range is meant for this particular pan size.
How long does a one-bowl chocolate cake bake?
Plan on 30–35 minutes at 350°F (175°C), checking slightly earlier in a hot oven. The cake is ready when the center is set and a toothpick has moist crumbs but no wet batter.
Is this cake made with cocoa or melted chocolate?
The cake batter uses natural unsweetened cocoa powder. Semisweet chocolate chips appear only in the optional two-ingredient glaze, so the main cake does not require melting chocolate.
Is the cake supposed to be fudgy?
It should be moist and tender, with a fully baked cake crumb. It is not designed to be dense like brownies or wet like chocolate pudding cake.
Why add hot water to chocolate cake?
The measured hot water helps disperse cocoa evenly and gives the batter a pourable consistency. Add it gradually rather than splashing boiling liquid directly onto the egg mixture.
Can I replace buttermilk with plain milk?
A direct swap may affect rise and tenderness because the acidity differs. Use buttermilk for the stated recipe; a tested alternative formula is preferable if you need to avoid it.
When should I add the glaze?
Wait until the cake is completely cool. Warm cake can melt the glaze and create streaks or pooling instead of a neat top layer.
How many slices does the cake serve?
The intended yield is nine moderate squares cut in a three-by-three pattern. You can make smaller bite-size pieces for a dessert table.
Does the glazed cake need refrigeration?
Yes, the glaze contains heavy cream. Refrigerate covered leftovers at 40°F (4°C) or colder and avoid leaving the cake out for prolonged periods.
Can I make it without a mixer?
Yes. A whisk and spatula are sufficient. The technique does not require creaming butter or beating whipped egg whites.
Can I taste the batter before baking?
No. Raw flour and eggs can carry germs. Bake the cake fully and use the toothpick test for doneness rather than tasting uncooked batter.
Final thoughts
A good one-bowl chocolate cake is more about measured ingredients and gentle mixing than fancy equipment. Whisk thoroughly while the ingredients are dry, stir only until the batter is combined, bake in the correct pan and cool the cake before glazing. Those decisions are more valuable than an elaborate topping.
This is a practical small-pan dessert with a cocoa-rich crumb and simple chocolate finish. The formula is an original AI-assisted editorial proposal not represented as personally kitchen-tested; follow the observable cooking cues, keep raw batter out of the mouth, and refrigerate the cream-glazed leftovers promptly.
Editorial transparency: this original AI-assisted cake formulation is not independently kitchen-tested. Its featured food image is an AI-generated illustration, not a photo proving a personally baked cake.
Print
One-Bowl Chocolate Cake with Easy Cocoa Glaze
- Prep Time: 15 minutes
- Cook Time: 35 minutes
- Total Time: About 115 minutes, including a full cooling period and glaze preparation
- Yield: One 8-inch square cake, about 9 dessert squares 1x
- Category: Cake
- Method: One-bowl whisked cocoa cake baked in an 8-inch square pan
- Cuisine: American
Description
Tender 8-inch one-bowl chocolate cake with cocoa, buttermilk and a two-ingredient chocolate glaze, no stand mixer needed.
Ingredients
1½ cups (180 g) all-purpose flour, spooned and leveled
1 cup (200 g) granulated sugar
⅓ cup (about 28 g) natural unsweetened cocoa powder
1 teaspoon baking soda
½ teaspoon baking powder
½ teaspoon fine salt
1 large egg
¾ cup (180 ml) cultured buttermilk
⅓ cup (80 ml) neutral vegetable oil
1 teaspoon vanilla extract
½ cup (120 ml) hot water
¾ cup (about 130 g) semisweet chocolate chips, for the glaze
¼ cup (60 ml) heavy cream, for the glaze
Instructions
Place the oven rack in the center and preheat to 350°F (175°C). Lightly grease an 8-inch square metal cake pan and line its bottom with parchment, leaving an overhang if desired.
In one large bowl, whisk 1½ cups flour, 1 cup sugar, ⅓ cup natural unsweetened cocoa, 1 teaspoon baking soda, ½ teaspoon baking powder and ½ teaspoon salt until evenly mixed and free from obvious lumps.
Add one egg, ¾ cup buttermilk, ⅓ cup vegetable oil and 1 teaspoon vanilla. Whisk gently until the flour almost disappears; scrape the bowl and stop before overmixing.
Gradually whisk in ½ cup hot water in two or three additions. Stir until the batter is smooth and pourable; use caution with the hot water and do not vigorously beat.
Pour the batter into the lined 8-inch pan, level it gently and bake 30–35 minutes. Check for a set center and a toothpick showing moist crumbs but no wet raw batter, adjusting for your oven.
Cool in the pan for at least 15 minutes, then allow the cake to become completely cool before glazing, about 60 minutes in total depending on the kitchen.
Put ¾ cup semisweet chocolate chips in a heatproof bowl. Warm ¼ cup heavy cream until steaming but not boiling vigorously, pour over the chips, wait two minutes and stir until smooth.
Spread the thin chocolate glaze over the completely cooled cake and let it settle for a few minutes.
Cut into nine squares. Do not taste raw batter. Because the glaze contains heavy cream, refrigerate covered leftovers promptly at 40°F (4°C) or colder.
Notes
AI-assisted original editorial cake formulation; not independently kitchen-tested. Do not taste raw batter containing flour and egg. Thin chocolate glaze contains heavy cream: refrigerate covered cake leftovers at 40°F (4°C) or colder, ideally use within 3–4 days. AI image is illustrative.
Nutrition
- Serving Size: 1 cake square (1 of 9)
Keywords: one bowl chocolate cake recipe, easy chocolate cake from scratch, cocoa chocolate cake, one bowl cake with glaze