
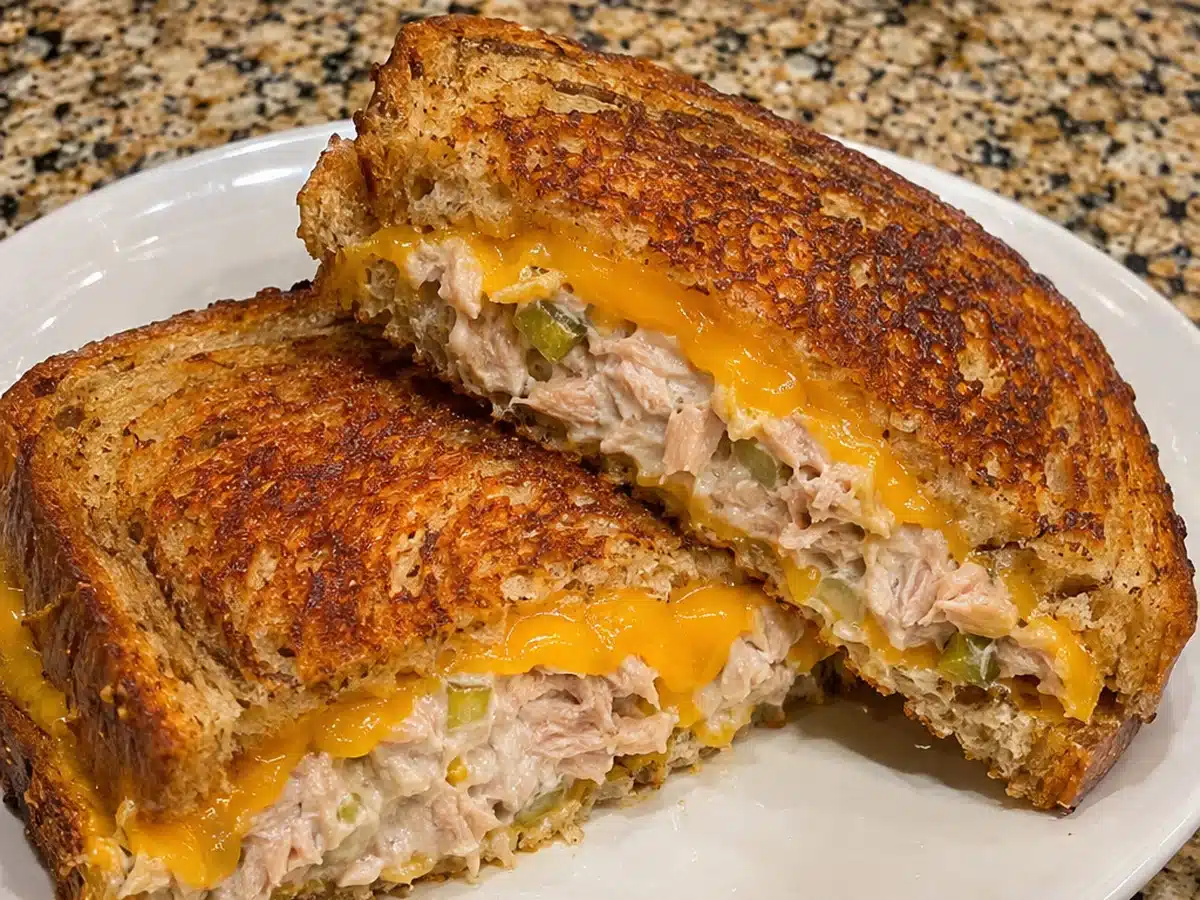
A classic tuna and dill pickle melt on buttery rye turns pantry staples into a warm, crisp sandwich with a creamy, savory center. Drained tuna and chopped dill pickles bring contrast, Dijon mustard sharpens the dressing, and cheddar melts between slices of butter-toasted rye. The trick is to keep the tuna filling moist but not wet, then cook the sandwich slowly enough for the cheese to melt before the bread gets too dark.
This guide covers the ingredient amounts, a practical skillet method, tips to avoid soggy bread, and answers to common tuna-melt questions. Skillet heat and bread thickness vary, so use the visual cues in the instructions and adjust the cooking time as needed.
Why This Tuna Melt Works
The filling has three different jobs. Tuna provides substance, mayonnaise binds the flakes, and finely chopped dill pickle adds acidity and crunch. A small amount of Dijon makes the filling taste more balanced without turning it into a mustard sandwich. Cheddar adds a creamy layer that helps the tuna filling feel like part of a hot sandwich rather than a scoop of cold salad between toasted slices.
Rye bread gives the sandwich a distinct, mildly earthy flavor and toasts into a sturdy crust. Butter goes on the outer bread surfaces, not straight into the filling. That separates the goals: you get golden, crisp bread on the outside and a soft, savory middle. None of the steps needs specialized equipment beyond a bowl, a spoon, a spatula, and a skillet.
Ingredients for Two Tuna Melts
- 2 cans tuna, 5 ounces each, thoroughly drained and flaked
- 1/4 cup mayonnaise
- 1/4 cup dill pickles, finely chopped
- 1/2 teaspoon Dijon mustard
- Salt and black pepper, to taste
- 4 slices rye bread
- 4 slices cheddar cheese
- 2 tablespoons softened butter
The recipe makes two full sandwiches, each containing two slices of bread and two slices of cheddar. Exact drained tuna weights vary with packing liquid and brand. If the tuna still looks wet after draining, let it sit briefly in a fine-mesh sieve. That small preparation step matters more than adding extra cheese or butter later to compensate for a damp sandwich.
Choosing Tuna for the Filling
Canned light tuna or another canned tuna you already enjoy can work here. The important detail is drainage. Water-packed tuna may be noticeably moist; oil-packed tuna may taste richer. Either way, excess liquid can soften the bread when heated. Empty the cans fully, press gently if necessary, then flake the fish with a fork before adding mayonnaise and pickles.
Use tuna that smells normal and comes from an intact, properly stored can. If a can is damaged, leaking, or swollen, do not use it. A good tuna melt should taste like tuna, dill pickle, and cheese rather than mostly mayonnaise. Start with the listed quantities before changing the ratio, because every additional spoonful of dressing affects how the sandwich browns and holds together.
Why Dill Pickles Belong in the Mix
Dill pickles cut through the richness of mayo and cheddar. Their small, crunchy pieces also give the filling texture, which is especially helpful when the tuna is very finely flaked. Chop the pickles into small, fairly even bits so each bite tastes balanced. Large pickle slices in the filling can make it harder to hold the sandwich together when turning it.
If your pickles are particularly juicy, drain the chopped pieces or pat them lightly with a clean paper towel before mixing. The goal is their tang, not all the brine from the jar. Sweet relish would make a different sandwich, so stick with dill pickles when following this version. Add extra pickles only after tasting the mixed filling; the baseline already contains a quarter cup.
Choosing Rye Bread and Cheddar
Choose four slices of rye bread that are substantial enough to hold a warm filling. Thin, airy slices can break when lifted with a spatula, while extremely thick slices take longer to heat through. A standard sandwich-cut rye is a sensible starting point. Check each slice for tears before assembling, and try to pair pieces of similar size for even contact with the pan.
Cheddar is the specified cheese because its flavor stands up to tuna and pickle. Two slices per sandwich create a noticeable melted layer without needing a pile of shredded cheese. Lay the slices so they cover most of the filling. If the cheese extends far beyond the bread, tuck the edges inward to reduce scorching on the pan while the sandwiches finish cooking.
Mixing a Creamy but Not Wet Filling
Place the drained, flaked tuna in a medium bowl. Add mayonnaise, finely chopped dill pickles, and Dijon mustard. Mix with a fork until the ingredients are combined. Season lightly with salt and black pepper, then taste before adding more. Canned tuna, pickles, and cheese may already bring a fair amount of salt, so a restrained first seasoning is sensible.
The finished mixture should sit in a loose mound on a spoon rather than running off it. If it pools liquid at the bottom of the bowl, drain off the excess before assembling. Avoid mixing so aggressively that the tuna turns into a uniform paste; some flake texture is useful. Divide the filling into two equal portions so both sandwiches cook and serve consistently.
How to Assemble the Sandwiches
Spread softened butter thinly across one side of each slice of rye. The buttered sides will face outward against the pan. Put two slices, butter-side down, on a clean work surface or directly into an appropriately sized skillet before it gets very hot. Spread half the tuna mixture on each bottom slice, leaving a small border near the edges to reduce spillage.
Top each mound of tuna with two cheddar slices. Add the remaining bread slices with their buttered sides facing upward. Press gently to bring the layers together; do not flatten the sandwiches into compressed blocks. Assemble both before cooking so you are not trying to spread mayonnaise or position cheese while one sandwich is already browning rapidly in the pan.
Cooking the Melt in a Skillet
Heat a large skillet over medium-low to medium heat. Place the assembled sandwiches in the pan and cook until the first side is golden, roughly three to five minutes depending on your pan and burner. Lift a corner carefully with the spatula to check the crust rather than relying on a timer alone. The bread should be toasted but not deeply charred before the cheese has softened.
Turn each sandwich in one controlled motion with a wide spatula. Cook the second side for another three to five minutes, adjusting the heat downward if the bread is darkening too quickly. If the cheese needs a little longer, lower the heat and briefly cover the skillet to retain warmth. Remove the sandwiches once both sides are crisp and the cheese is melted. Rest for a minute, then cut and serve.
How to Avoid a Soggy Tuna Melt
Dry filling and appropriate heat are the most reliable defenses against sogginess. Drain the tuna and pickle pieces, keep the mayonnaise within the recipe amount, and spread the filling in a level layer. A high mound of tuna makes the center slow to heat and can push the bread apart during the flip. Bread that is already damp before cooking will not develop the same crisp crust.
Avoid cooking over very high heat just to shorten the time. That approach can brown the outside while leaving the cheese firm and the middle cool. Likewise, do not put a finished sandwich straight into a sealed container, where trapped steam can soften the rye. Serve it promptly on a plate and allow a brief rest if the filling is very hot.
Getting Golden Bread Without Burning It
Softened butter spreads evenly and helps prevent patches of dry bread beside greasy spots. Divide the two tablespoons among the four outer surfaces, using just enough for a thin layer. Preheating the skillet moderately, rather than until smoking, gives you more control. The exact browning rate depends on your skillet material, stove setting, bread thickness, and how much moisture is in the filling.
If one side of your stove runs hotter, move or rotate the sandwiches during cooking. Inspect the bottoms early on your first attempt. The ideal finish has visible toast marks and a firm crust but still bends slightly when pressed. Dark spots are a sign to lower the heat. The sandwich is ready when the cheese and tuna are warm, not when the bread reaches a specific color at any cost.
Serving the Melt
Use a sharp knife to cut each sandwich in half after a short rest, and wipe the blade between cuts if it drags filling out. A diagonal cut makes the layers easy to see, but it is not essential. Serve immediately while the bread is crisp and the cheddar is soft. A plain plate works well; the filling already delivers the savory, tangy character of the dish.
Because this is a rich sandwich, lighter accompaniments may suit it, but the core recipe does not depend on any side dishes. Keep any sides separate from the toast so they do not add moisture. If you are serving multiple people, cook in batches rather than overcrowding the skillet; space makes flipping easier and helps the slices brown more consistently.
Helpful Timing and Equipment Notes
Plan on roughly ten minutes for opening and draining the tuna, chopping pickles, mixing the filling, and buttering the bread. Cooking two sandwiches usually takes about eight to ten minutes when the skillet is at a controlled temperature. Treat these as planning estimates, not laboratory-tested guarantees; the final timing should be updated after a documented kitchen trial.
A fork, bowl, butter knife, large skillet, and wide spatula are the main tools. A lid is optional if you need extra time for the cheese to melt at low heat. A nonstick or well-seasoned skillet can make flipping easier, but ordinary cookware works if you monitor heat and use sufficient butter on the bread. Never leave buttered bread unattended on a hot burner.
Variations That Keep the Recipe Recognizable
The simplest way to adjust the recipe is to tune the balance within the same eight ingredients. For a slightly sharper bite, use a small amount more Dijon or a few extra chopped pickles, remembering that pickle moisture also rises. For a less creamy filling, reduce mayonnaise slightly rather than swapping in an unrelated sauce. Changes like these can affect the final result and should be re-tested before publishing them as recommended variations.
Changing the bread or cheese would create a different version and could alter cooking behavior significantly. This article focuses on buttery rye and cheddar, not on every possible tuna sandwich. Keeping the base recipe stable makes it easier to compare the next kitchen test, identify what works, and photograph a result that genuinely matches the written directions.
Make-Ahead and Storage
You can mix the tuna filling shortly before cooking and keep it covered in the refrigerator while you prepare the other ingredients. For longer storage, follow standard food-safety handling and avoid leaving prepared tuna salad at room temperature. The sandwich itself is best assembled just before it goes into the skillet; prepared sandwiches can absorb moisture even before the heat is turned on.
Refrigerate leftovers promptly in a suitable container. Reheat gently in a skillet until hot throughout, taking care not to scorch the bread. For leftovers containing fish and mayonnaise, follow current food-safety guidance on storage time and reheat temperature; do not rely solely on appearance or smell to determine safety. A reheated sandwich may be softer than a freshly cooked one, even when handled carefully.
Troubleshooting Common Problems
The bread burns before the cheese melts: Reduce the burner temperature and give the sandwich more time. A brief covered finish at low heat can help. The filling leaks out: Use less per sandwich, leave a border, and press lightly before turning. The center seems watery: Drain the tuna and pickles more thoroughly in the next batch and avoid adding extra mayonnaise without tasting first.
One sandwich browns much faster: Rotate their positions or cook them separately. The bread tears during flipping: Choose more substantial slices and use a spatula that supports most of the sandwich. The cheddar looks unmelted: Check the heat rather than raising it sharply; time at moderate heat works better than a scorched exterior.
Classic Tuna and Dill Pickle Melt Recipe Card
The recipe card below is intended to use the same eight ingredients and skillet method described above. Its ingredient amounts and timing must match the editorial text exactly. The card image must be attached to the Tasty Recipes card itself, not only to the surrounding article.
Print
Classic Tuna and Dill Pickle Melt on Buttery Rye
- Prep Time: 10 minutes
- Cook Time: 10 minutes
- Total Time: 20 minutes
- Yield: 2 sandwiches 1x
- Category: Sandwiches and melts
- Method: Skillet
- Cuisine: American
Description
A crisp skillet tuna melt on buttery rye with finely chopped dill pickles, creamy tuna filling, Dijon mustard, and melted cheddar.
Ingredients
2 cans (5 oz each) tuna, thoroughly drained and flaked
1/4 cup mayonnaise
1/4 cup dill pickles, finely chopped and drained if wet
1/2 teaspoon Dijon mustard
Salt and black pepper, to taste
4 slices rye bread
4 slices cheddar cheese
2 tablespoons butter, softened
Instructions
1. Drain the tuna thoroughly, then flake it with a fork in a medium bowl. Add the mayonnaise, finely chopped dill pickles, and Dijon. Season lightly with salt and pepper; mix until just combined.
2. Spread softened butter on one side of each of the four rye slices. Place two slices butter-side down on a clean surface. Divide the tuna mixture equally between them and spread it evenly, leaving a small margin near each edge.
3. Top each portion of tuna filling with two cheddar slices. Close with the remaining bread, butter-side up. Press gently without flattening the filling.
4. Set a large skillet over medium-low to medium heat. Cook the sandwiches for approximately 3 to 5 minutes on the first side, checking the underside until the rye is golden.
5. Flip carefully with a wide spatula. Cook the second side for approximately 3 to 5 minutes, lowering the heat if the bread browns too quickly. Cover briefly at low heat if more time is needed to melt the cheese.
6. Remove when both sides are toasted, the cheese is melted, and the filling is hot. Rest about one minute, cut in half, and serve promptly. Adjust times based on the skillet and a real kitchen test.
Notes
AI-assisted editorial formulation, not independently kitchen-tested. Timings, yield, image fidelity, ingredient list, and food-safety handling require accountable human review before release. Drain tuna and pickles to prevent sogginess. Refrigerate prepared fish salad promptly and reheat leftovers safely.
Nutrition
- Serving Size: 1 sandwich
Keywords: tuna and dill pickle melt, tuna melt on rye bread, classic tuna melt, cheddar tuna sandwich
Frequently Asked Questions
Can I use tuna packed in water?
Yes. Water-packed tuna is suitable for a classic tuna melt as long as you drain it thoroughly. Water remaining in the fish can loosen the mayonnaise mixture and make rye bread soften more quickly. Flake the drained tuna with a fork before adding the pickles and dressing so the texture stays even.
Can I use tuna packed in oil?
Yes, but drain it first. Oil-packed tuna can make the filling feel richer, which may mean you prefer a little less mayonnaise. Because that changes the original formula, start with the published amounts for the base recipe and record any adjustments when testing your own preferred version.
Is dill pickle relish the same as chopped pickles?
Not always. Some relishes contain sugar or more brine than chopped dill pickles, which changes both flavor and moisture. For this recipe, chop ordinary dill pickles finely and drain off excess liquid. That preserves a distinct tang and little crunchy pieces in the tuna filling.
Why is my tuna melt soggy?
The usual causes are tuna that was not drained, watery chopped pickles, too much dressing, or a sandwich assembled too long before cooking. Butter only the outer bread surfaces and cook at moderate heat. Serve promptly so steam does not collect under or around the toasted rye.
What heat is best for a tuna melt?
Medium-low to medium heat is a practical starting point. The aim is to brown the bread at the same pace that the cheddar melts and the filling warms. Your skillet may need a different setting, so inspect the underside after a couple of minutes and adjust before the bread becomes too dark.
Can I make the tuna filling in advance?
You can prepare the mixture ahead and refrigerate it promptly in a covered container, following safe storage guidance for prepared fish salads. Assemble the bread and cheese when you are ready to cook. That helps keep the bread from soaking up moisture during refrigerator storage.
What cheese goes in this version?
Cheddar is part of the specified recipe. Use four slices for two sandwiches, with two slices layered over each portion of tuna filling. Cheddar gives the melt its characteristic savory flavor. Cheese substitutions will change both flavor and melting behavior, so adjust the cooking time and heat as needed.
Does the tuna melt need an oven?
No. This method uses a skillet, so an oven is unnecessary. A lid can help retain heat briefly if the cheddar needs more time to soften. Watch the bread carefully and keep the heat moderate so the second side finishes golden rather than burned.
Final Notes Before Cooking
For the most consistent result, use the original ingredient proportions, drain the wet ingredients, divide the filling evenly, and let each sandwich toast gently. A little patience during browning gives the cheese time to melt without sacrificing the crust. Once you learn how your skillet behaves with rye bread, the sequence becomes straightforward.
Recipe note: This recipe is based on the documented ingredient list and preparation method with AI-assisted editorial support. It has not been independently kitchen-tested; prep and cooking times are estimates that may vary by skillet and bread thickness. The accompanying image is illustrative.